Bottom Line: In this post we look at 3 ways to copy down values in blank cells in a column. The techniques include using a formula, Power Query, and a VBA macro.
Skill Level: Intermediate
Watch the Tutorial
Download the Excel Files
You can download both the BEGIN and FINAL files if you want to follow along and practice.
Filling Down Blank Cells
Excel makes it easy to fill down, or copy down, a value into the cells below. You can simply double-click or drag down the fill handle for the cell that you want copied, to populate the cells below it with the same value.
But is there an easy way to replicate that process hundreds of times for reports that have large amounts of data?
In this post we'll look at three ways to automate this process with: a simple formula, Power Query, and a VBA macro.
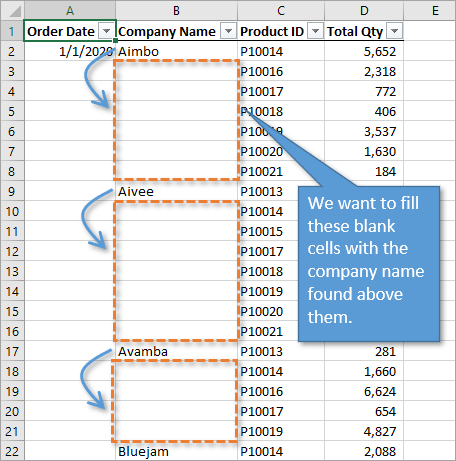
1. Filling Down Using a Formula
The first way to solve this problem is by using a very simple formula in all of the blank cells that references the cell above. Here are the steps.
Step 1: Select the Blank Cells
In order to select the blank cells in a column and fill them with a formula, we start by selecting all of the cells (including the populated cells). There are many ways to do this, including holding the Shift key down while you navigate to the bottom of your column, or if your data is in an Excel Table, using the keyboard shortcut Ctrl+Space.
Checkout my posts on 7 Keyboard Shortcuts for Selecting Cells and Ranges in Excel and 5 Keyboard Shortcuts for Rows and Columns in Excel to learn more.
With all of those cells selected, we can pare down our selection to include only the blank cells. This is done by using the Go To Special window from the Find & Select menu on the Home tab of the ribbon.

An alternative is to open the Go To window using F5 or Ctrl+G. Then press the Special button for the Go To Special window.
Once the Go To Special window is open, you can choose the option that says Blanks. This will select only the blank cells from the current selection.
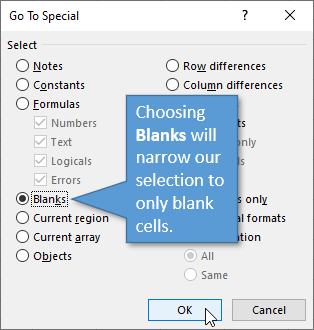
When you hit OK, you'll notice that the cells that have values in them are no longer selected.
Step 2: Write the Formula
From here you can start typing the formula, which is very simple. Type the equals sign (=) and then reference the cell above (in the case of our example, B2). That's all you need for the formula!
Step 3: Ctrl+Enter the Formula
After writing the formula, don't just hit Enter. Instead, use Ctrl+Enter to fill all of the selected cells with the same formula. Hold the Ctrl key, then hit Enter.
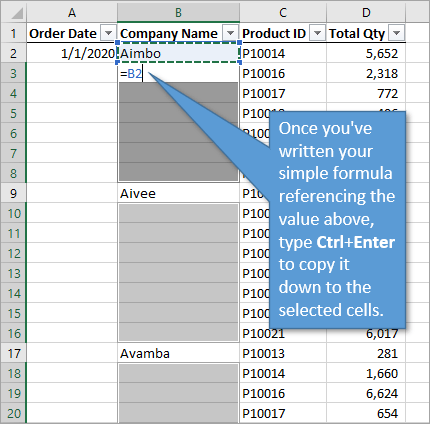
Because your formula reference is relative (B2), not absolute ($B$2), each cell will simply copy the value for the cell directly above it.
Step 4: Copy & Paste Values
It is a good idea to now copy the entire data column and then paste over it using the Paste Values option so that the data is hard coded. Then, if you do any sorting, the data will not change. You can find the Paste Values option on the Home tab in the Paste drop-down menu:

There are other ways to paste values, including the right-click menu or using keyboard shortcuts. These posts explain those options:
Paste Values with the Right-click & Drag Mouse Shortcut
5 Keyboard Shortcuts to Paste Values in Excel
2. Filling Down Using Power Query
For this option, your data should be in Excel Table format. From anywhere inside the table, you can select the Data or Power Query tab, and then select From Table/Range. You can also create a query that connects to a different data source like a database or the web.
This opens up the Power Query Editor. In Power Query, the blank cells are labeled as null in each cell.
To fill down, just right-click on the column header and select Fill and then Down.
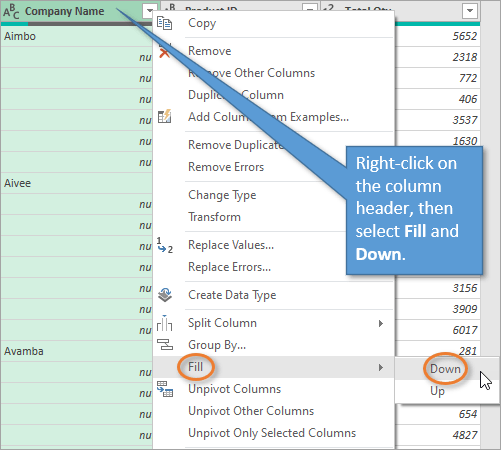
Power Query will fill down each section of blank cells in the column with the value from the cell above it.
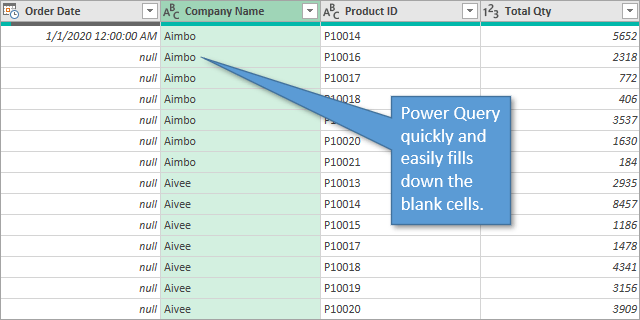
When you click on Close & Load, a new sheet will be added to the workbook with these changes.
This process of filling down can be done for multiple columns simultaneously by first selecting multiple columns with Ctrl or Shift, then performing the Fill > Down operation.
If Power Query is somewhat new to you, I invite you to check out this post: Power Query Overview: An Introduction to Excel’s Most Powerful Data Tool.
Free Webinar on Power Query, VBA, & More
I also have a free webinar running right now that covers an introduction to Power Query and the other Excel tools like Power Pivot, Power BI, Macros & VBA, pivot tables, and more.

Click here to register for the webinar
3. Filling Down Using a Macro
To fill down using a macro, start by opening the VB Editor. You can do this by going to the Developer tab and clicking on the Visual Basic button or by using the keyboard shortcut Alt+F11. Insert a new code module, and then write your macro.
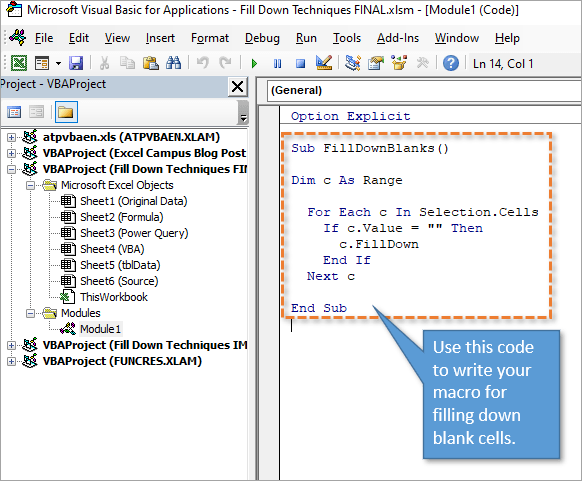
This macro loops through all of the cells in the selected range and performs the FillDown method if the cell is blank. The FillDown method copies the value from the cell above.
If this is a macro that you could use frequently, you might want to consider adding this macro to your personal Macro Workbook and creating a customized button for it. That's what I've done and it looks like this on my Ribbon.
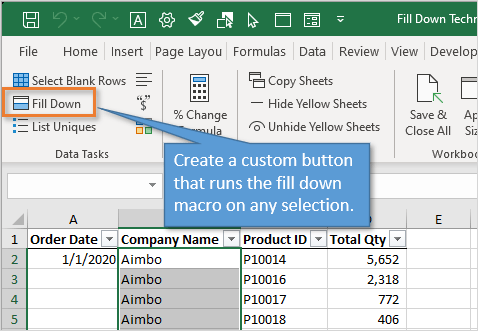
For instruction on how to create a Personal Macro Workbook and custom Ribbon buttons, check out this tutorial: How to Create a Personal Macro Workbook (Video Series).
Pros and Cons
So which of these three methods are right for you? Consider these things:
- The formula method is simple and easy to implement. It can be done without any knowledge of Power Query or VBA. However, it's not as quick as a one-click button solution.
- Power Query requires source data that outputs into a separate worksheet, so it's more of a process than simply filling down blank cells. If you are already data cleansing on a regular basis for other things, adding this to your existing process might make more sense.
- Once the initial macro is set up, VBA is a quick solution that's easy to use—just click a button. However, there is a big disadvantage of this method. You aren't able to undo your action once that button has been pushed, so you would have to be sure to save a backup copy beforehand if that is a concern for you.
Conclusion
There are three different methods for a very common Excel task. Did I miss any? Please leave a comment below if you have another way to go about it, or have any questions. Thanks! 🙂



Hey Jon, do you have a video or tutorial about importing data using PowerQuery when the number and order of column change?
Example (assume all columns has numeric data and [A], [B], [C], [D], [F] are headers):
The month 1 report contains these columns:
[A] [B] [C] [D]
The month 2 report contains these columns:
[A] [C] [D] [F]
The month 3 report contains these columns:
[B] [F]
Another awesome vid Jon!
Hi There,
I’ve been using Excel & VBA for 20~25 years, and I didn’t know about the dbl-click fill thing :-O
So, subscribed to your newsletter, but I can’t see a way to become a member? Am I being as dense as I obviously have been for 20 years?
Thanks – great site btw
Excellent video, very useful. thanks, John
Hey Jon! I’ve been using the GoTo button to select blanks cells for a while now, so I was excited to see a macro for it. When I tried yours out, it locked up my computer because I selected the entire column since the number of rows in my data fluctuates. But, when I tried adding an “active range” fix to meet my needs, I found that the GoTo method (Selection.SpecialCells(xlCellTypeBlanks).Select) at the beginning of the macro did the job! Thanks for the incentive to automate yet another daily task!
[…] Източник: 3 Ways to Fill Down Blank Cells. […]
I have been using the fill blanks VBA code which I have added to my personal tool belt and it works great. I have an issue now though with some data.
I have a formula in cells which returns either a value or leaves a cell blank =IF(ISBLANK(‘AR Balance Pivot’!B4),””,’AR Balance Pivot’!B4). However when I then try to use the fill blanks macro it will not work as the cell isn’t actually blank but contains the formula, its the displayed formula result which is blank.
Is there a way to change the fill blanks code so that it treats blank formula results as blank cells? (hope that makes sense)
This is excellent. I have been trying to find a solution for this for some time. Thank you for this – it is a huge time saver!
Thanks for the info. Sadly, this formula method use to work for me, but now it does not for me any more, the ctrl+shift pastes the the same function into each of the selected blank cells =a1, =a1, =a1. It does not paste as the incremental formula =a1, =a2, =a3
Dear Jon, there is a simpler method. Select the populated cell plus the blank cells below (or to the right if you want to copy horizontally) and press CTRL+D (or CTRL+R for the horizontal copying).
That will fill all cells with the value in the top selected cell. The method described is used when copying down to fill gaps between different values.
I hate that the code is not easy to copy
I need help duplicating one column with 10 cells down the row and duplicate them under each other in the same column. This method only works if you have one cell and duplicating under it. What if you have multiple (lets say 5) and need to duplicate those 5 under each other in one column?
Thank you so much!! This was exactly what I needed to create a report at work.
Thank you so much! It helped a lot 🙂
CT 6/9/2022 16:42 Active Yet to start more_vert
Tan Cheung Meng
1000800 | IEEE-000114
NN 6/9/2022 16:42 Active Yet to start more_vert
Nursari Napitupulu
10000900 | AEe-185476
so for data like above if i have to pull the second cell “Tan Cheung Meng” and 3rd cell “1000800 | IEEE-000114” to the same line where it shows active, which VBA formula can i use?
Just insert a helper column with the formula =IF(ISBLANK(B2),B1,B2)
Thanks! I was searching for days for this vba code, with the exact example….
OMG! Amazing trick that will save me hours in reporting! TY so much! 🙂
Thank you, helped me, when I needed exactly the same thing. Cool options.
Perfect exactly what I was looking for.
Thanks