Bottom line: Learn 18 tips & shortcuts to save time with writing VBA macros for Excel or other Office applications.
Skill level: Intermediate
18 VBA Macro Tips & Shortcuts
At the beginning of last year I wrote a popular post on 17 Excel Shortcuts for 2017. I decided to continue the tradition this year and write a post on tips & shortcuts that will save you time when writing VBA macros.
These are some of my favorite tips, and also some favorites from the blog, YouTube Channel, and my VBA Pro Course. If you're not familiar with VBA yet, but always wanted to learn, then check out my upcoming webinar on “The Modern Excel Power Tools”.
Check out our new VBA Keyboard Shortcuts List with over 25 shortcuts for the Windows and Mac versions of Excel.
Obviously there are a TON of shortcuts & tips for VBA. So please leave a comment at the bottom of the post with your favorite tips. This way we can all learn from each other! 🙂
Download the PDF
Here is a printable PDF version of the article.
Page Index
- Alt+F11 to Open the VB Editor
- Store Your Macros in The Personal Macro Workbook
- Ctrl+Space to Auto Complete
- Intellisense for Worksheets
- Use Comments Liberally
- F8 to Step Through Each Line of Code
- Assign Macros to Shapes
- Automate Repetitive Tasks with The For Next Loop
- Use Option Explicit
- Excel Tables (ListObjects)
- Get Code with the Macro Recorder
- The Immediate Window
- Assign a Keyboard Shortcut to a Macro
- Check That a Range is Selected
- Ctrl + Y to Delete a Line of Code
- Ctrl + i for Quick Info
- Ctrl+J Opens the Intellisense Drop Down
- Worksheet Functions
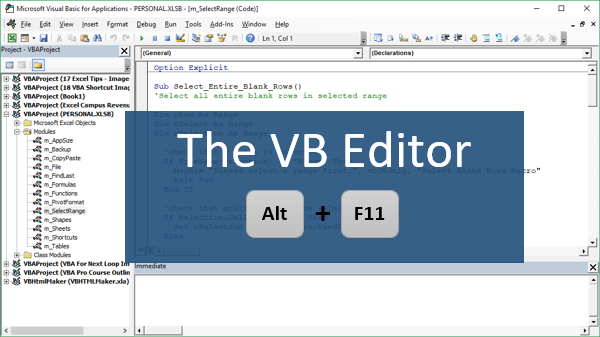
#1 – Alt+F11 to Open the VB Editor
The VB Editor is the application we use to write macros and create userforms. It can be opened by clicking the Visual Basic button on the Developer tab in Excel.
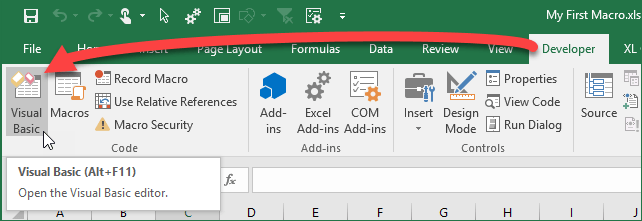
The keyboard shortcut to open the VB Editor in any Windows version of Excel is Alt+F11.
The shortcut in the Mac version is Opt+F11 or Fn+Opt+F11.
If you don't see the Developer tab in the Ribbon, click the image to learn how to enable it: 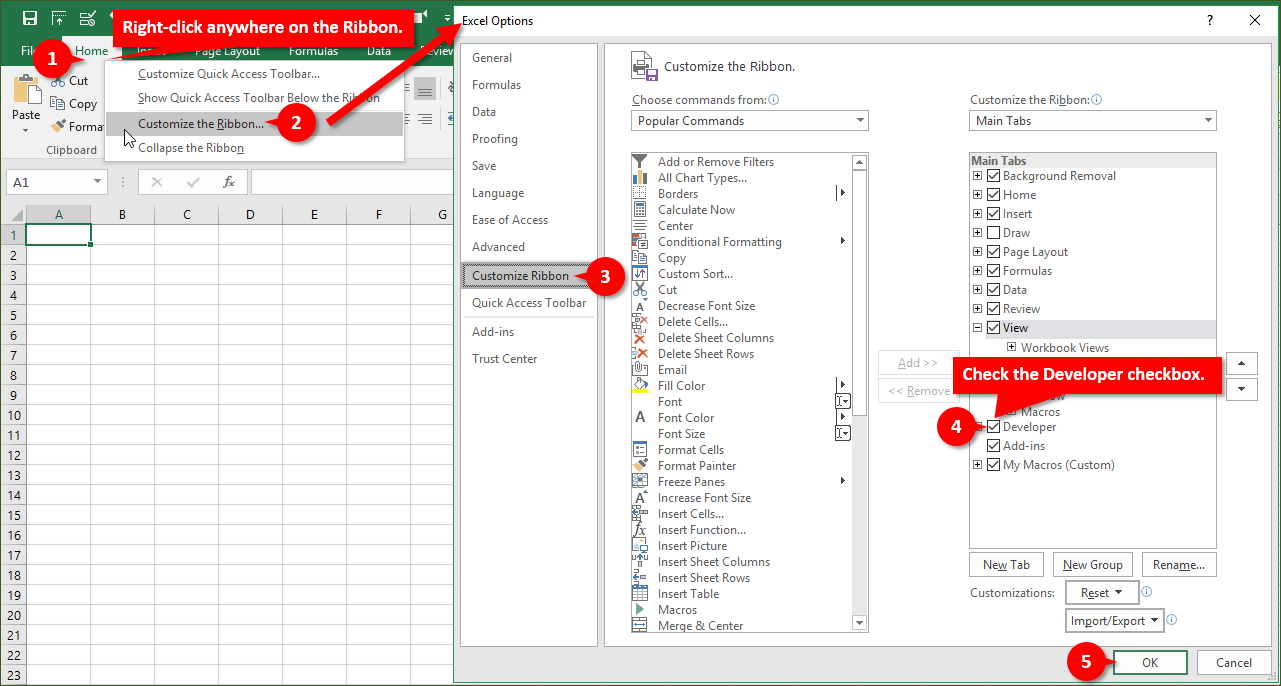
The Fn (Function) Keys on Laptops
If you are using a laptop keyboard then you might also need to press & hold the Fn key before pressing F11. The function keys on laptops are typically multi-use keys, and require the Fn key to be pressed to activate the function keys (F1–F12).
Some laptops have a Fn Lock feature that makes the function keys primary, which means you won't have to press the Fn key when pressing F1-F12.
Checkout my article on the Best Keyboards for Excel Keyboard Shortcuts to learn more.
#2 – Store Your Macros in The Personal Macro Workbook
The Personal Macro Workbook (PMW) is a great place to store the macros you use often. This workbook opens in the background every time we open Excel, making our macros easily accessible.
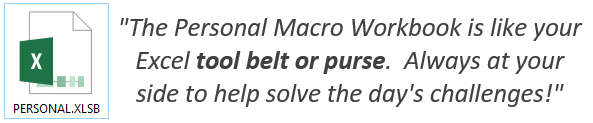
We can also create custom toolbars with buttons to run our macros. I like to think of the PMW as our Excel tool belt that can save us time with task we do every day.
For example, I have an article with a macro that creates a list of unique values on a new blank sheet. We can store this macro in our PMW and assign it to a button in the ribbon or keyboard shortcut, and then run it any time on any open workbook.
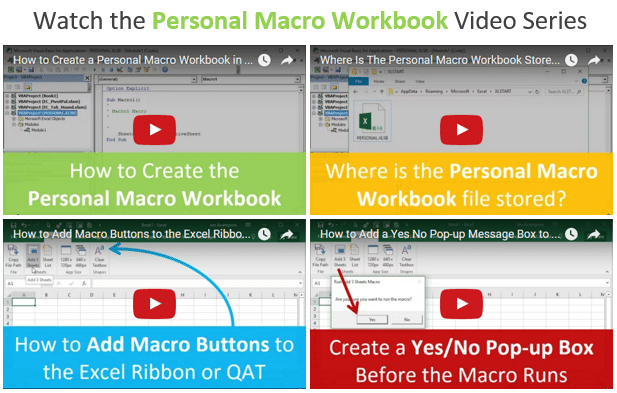
Checkout my free video series on how to create your Personal Macro Workbook to learn more. There is also a video in that series on how to add macro buttons to a custom ribbon.
#3 – Ctrl+Space to Auto Complete
This is definitely one of the keyboard shortcuts I use the most in VBA. When we are typing code, Ctrl+Space opens the Intellisense drop-down menu that contains a list of matching objects, properties, methods, constants, and variables.
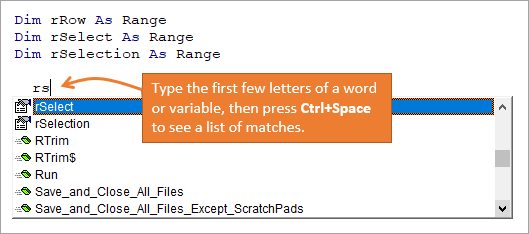
To use the Ctrl+Space shortcut in the VB Editor:
- Start typing a line of code like ActiveCell.
- After typing the first few letters, press Ctrl+Space
- You will see a list of all VBA words that start with Act.
- Press the Up/Down arrows to select the word
- Then press Tab or Enter to complete the word.
There are two major benefits to this shortcut:
- It saves time with having to type long words and variable names.
- It prevents typos because VBA is completing the words for you.
These benefits can be a HUGE time saver when debugging your code.
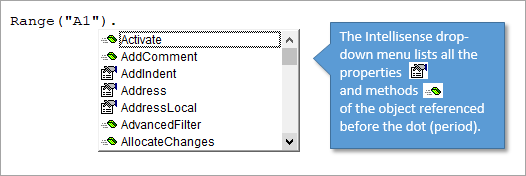
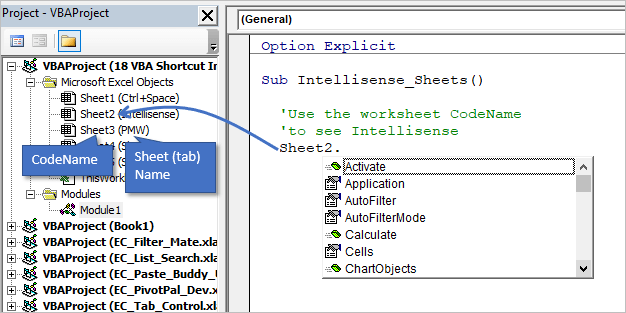
#4 – Intellisense for Worksheets
We typically also see the Intellisense drop-down menu after typing a period (.) in the VB Editor.
However, sometimes it doesn't work. One common case is with the Worksheets property.
If we type Worksheets("Sheet1"). , we do NOT see the Intellisense menu. This can be frustrating and cause you to think that Intellisense is not working.

The reason it doesn't work is because the Worksheets property can contain reference to one or multiple sheets. Depending on the reference, the properties and methods will be different for each case. It would be great if Intellisense was still intelligent enough to recognize this, but it's just one of those things we have to live with…
There are two ways to get around it and see Intellisense for worksheets:
- Use the CodeName of the worksheet we want to reference. This is my preferred method for referencing worksheets because the code will not break if a user changes a sheet name.

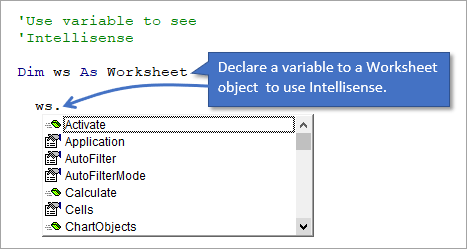
- Set the worksheet to a Worksheets object variable first. Then when we type the variable name followed by a dot (
ws.), the Intellisense menu will appear.
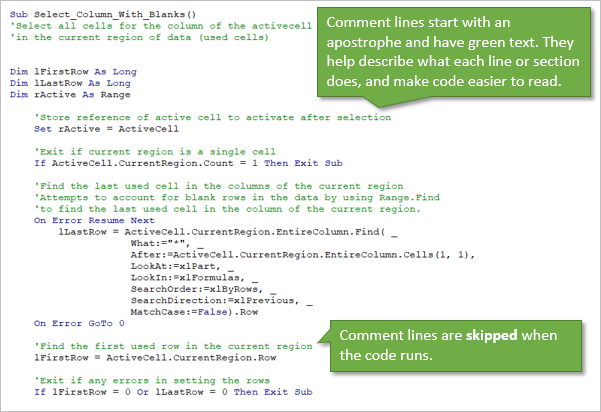
#5 – Use Comments Liberally
We can add comments to our code that help explain what each section of code does.
To create a comment in VBA you type an apostrophe at the beginning of the line. Once you move the text cursor off the line, the text will turn green.
The green text makes it easy to distinguish comments when reading code. VBA completely ignores comment lines, and you can add as many as you'd like.
Commenting your code is somewhat of a controversial topic. Some developers believe that properly written code should speak for itself, and that you don't need to add extra comments. I see their point, but this doesn't work for me for two reasons.
- When I come back to my own projects months/years later, I don't remember what the entire macro does. Comments are like headings in this blog post, and make it easy to scan through the macro to find the section you are looking for. They also quickly tell us what each section does.
- If you are going to share your VBA project or eventually hand it off to someone else for maintenance, then it will be much easier for them to learn your code if you add a lot of comments. I call this “politely planning your legacy”. 🙂
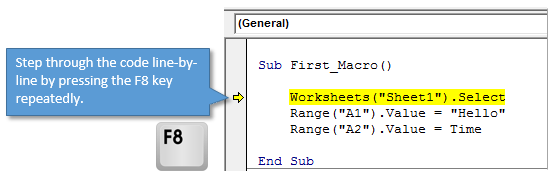
#6 – F8 to Step Through Each Line of Code
The keyboard shortcut to step through each line of code is F8. The Mac equivalent for Step Into/Through is Cmd+Shift+I.
This allows us to test and debug each line of code in our macros. We can also open Excel side-by-side with the VB Editor (or on a separate monitor) to see the actions being performed in Excel as each line runs.
A lot times this can help you quickly find an error with a sheet or range reference.
To use the Step Into/Through shortcut:
- Click inside the macro you want to run. You can click any line of code. The macro will always start at the top.
- Press F8.
- The macro name will be highlighted yellow.
- Press F8 again to run that line and highlight the next line.
- Continue to press F8 to run each line.
It's important to note that the yellow highlighted line has NOT been run yet. It will be run when you press F8 again.
I cover this technique in more detail in my free upcoming webinar on “The 7 Steps to Getting Started with Macros & VBA”.
#7 – Assign Macros to Shapes
The sheet controls for buttons that run macros are a bit dated looking. Fortunately we can also use any shape in Excel to run a macro. The shapes can be colored and formatted to make them look more like modern buttons you find on the web and mobile apps.
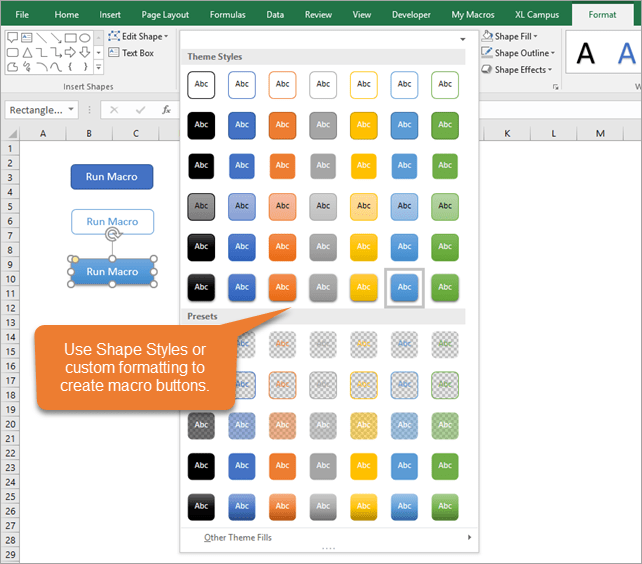
To assign a macro so a shape:
- Insert a shape on a worksheet, and format it to your liking. This will usually be a rectangular or circle shape that contains text.
- Right-click the shape and choose “Assign Macro…”.
- Select the macro from the list and press OK. The macro will usually be one that is stored in the same workbook as the shape.
- Click off the shape by selecting a cell in the worksheet.
- When you hover the shape the cursor will change to the hand pointer. Clicking the shape will run the macro.
I recommend having a Yes/No message box appear before the macro actually runs. This prevents any accidental button presses. Checkout my video on adding a Yes/No message box to your macros. It's part of my video series on the Personal Macro Workbook.
#8 – Automate Repetitive Tasks with The For Next Loop
We tend to do a lot of the same tasks over and over again in Excel. This can be tasks like: applying formatting to multiple ranges/sheets, creating a list of sheets, copying data to each workbook, setting filters on each pivot table, etc.
Loops are one of the most powerful tools in VBA that allow us to automate these tasks. The loop will loop through each item in a collection (think worksheets in a workbook or cells in a range), and perform whatever code you like on each item.
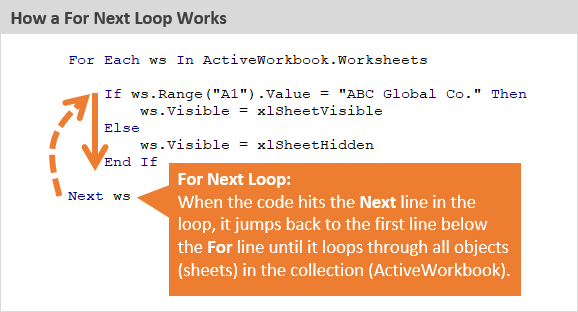
There are a few different types of loops, but the For Next Loop is the most common. Checkout my in-depth article on The For Next Loop in VBA for more details on this must-know coding technique.
In my free upcoming webinar on “The 7 Steps to Getting Started with Macros & VBA”, I explain how to use a For Next Loop to list all the sheets in any workbook. This creates a quick table of contents with a click of a button.
#9 – Use Option Explicit
This is another controversial topic, but I require (politely ask) that all members of my VBA Pro Course use Option Explicit.
So, what is it and why?
Option Explicit requires us to declare all variables. When we see lines of code with Dim statements at the top of a macro, this is declaring a variable.
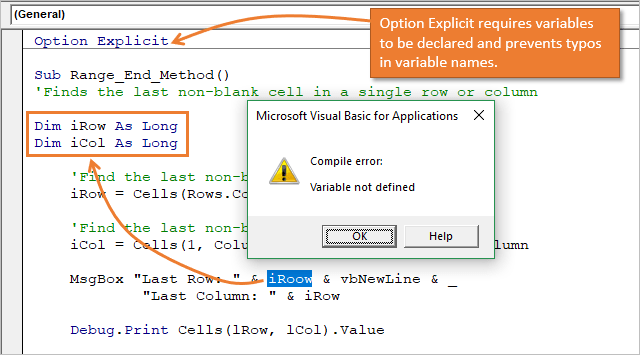
We are basically telling VBA to create the variable in memory to be used later while the code is running. We can then set values or references to objects to these variables in the macro below the Dim statement.
The MAJOR benefit with Option Explicit is that it prevents typos and saves time. The VB Editor will throw a Compile Error: Variable Not Defined when you try to run the code if a variable in the code is not declared. It will also highlight the variable so you can declare it or fix a typo.
If you don't have Option Explicit on and misspell a variable, the code will still run and can produce errors in the results. If your macro is long then then it can take A LOT of time to find these typos. Trust me. Been there done that!
Option Explicit prevents these errors and helps keep you sane. 🙂
To turn Option Explicit on you simply type the words Option Explicit at the top of the code module. You can also have the VB Editor automatically add the words to new code modules by going to Tools > Options > check the “Require Variable Declaration” checkbox. Option Explicit will now appear at the top of each NEW code module you create.
#10 – Excel Tables (ListObjects)
There are a lot of benefits of using Excel Tables in our workbooks. They save time with formatting data, auto-fill formulas, and work great as the source of a pivot table.
Excel Tables also make it much easier to write VBA code for dynamic ranges of data. This is a list or data set where the number of rows or columns is constantly changing as you get new/updated data.
For example, the following line of code references the cells in range A2:A15.
Range("A2:A10").Font.Bold = True
That is a hard-coded range reference. If you add new data to the bottom, you will have to manually change the code to include the new rows.
However, if we store the data in an Excel Table and reference the Table column, we don't have to worry about this.
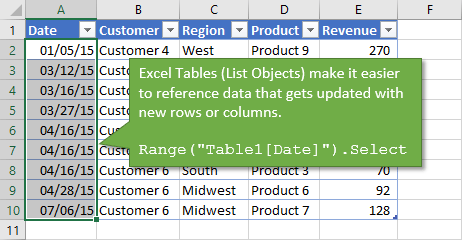
The following line of code references the same column.
Range("Table1[Date]").Font.Bold = True
The advantage here is that the code will automatically include new rows added to the Table. No manual updating or maintenance of the code is needed.
We can also reference Excel Tables with the ListObjects object, properties, and methods in VBA.
ActiveSheet.ListObjects("Table57").ListColumns("Date").DataBodyRange.Font.Bold = True
There are definitely some advantages to using ListObjects when it comes to modifying the Table structure (adding/deleting rows/columns) and properties, and looping through the Table. Checkout my good friend Chris Newman's article on ListObjects in VBA for more examples.
#11 – Get Code with the Macro Recorder
The Macro Recorder is an amazing feature of Excel and VBA. It creates VBA code as we take actions in Excel.
For example, after we turn the macro recorder on, we can go do our normal work in Excel like writing formulas or copying and pasting data. The macro recorder will create all the VBA code for these actions, and store it in a code module.
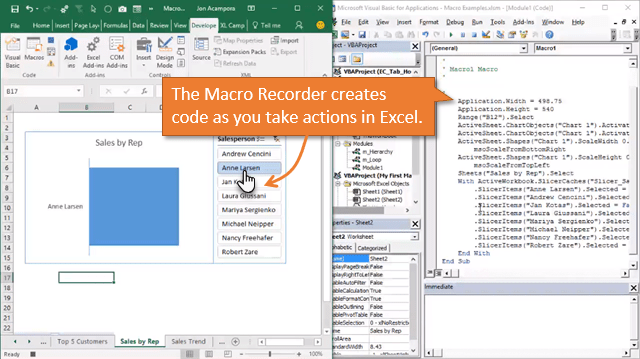
This is a great tool to use when we are first start with macros. And it's also a great tool for learning and getting snippets of code. The Excel object model is massive, and it's impossible (for me) to memorize all the property, method, and object references. So the macro recorder is a great way to get some code for a pivot table, list object, slicer, shape, or any other object you are not familiar with.
The macro recorder also has its limitations. It's NOT going to create code for loops, if statements, error handling, message boxes, etc. We need to learn how to write code to implement these more advanced techniques that allow us to fully automate processes and create applications in Excel.
Checkout my free upcoming webinar on “The 7 Steps to Getting Started with Macros & VBA”.
#12 – The Immediate Window
The Immediate Window in the VB Editor allows us to run a single line of code. We can run an action (method) on an object, or return the result of the code back to the Immediate Window. Maybe we want to determine how many worksheets are in a workbook.
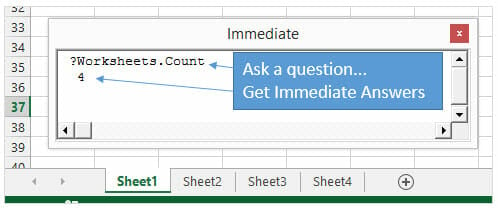
Type ?Worksheets.Count and hit Enter. The result will be displayed on the line below.
The Immediate Window is also the place that the Debug.Print method outputs to.
The keyboard shortcut to open the Immediate Window in the VB Editor is Ctrl+G
Checkout my article on 5 Uses for the Immediate Window in VBA for more details.
#13 – Assign a Keyboard Shortcut to a Macro
We can also assign keyboard shortcuts to run macros that we use frequently. I recommend storing these macros in your Personal Macro Workbook.
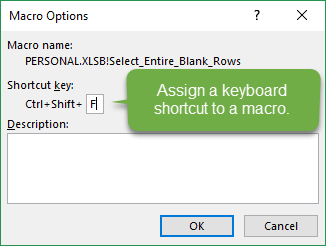
To assign the keyboard shortcut:
- Press the Macros button on the Developer or View Tab in the ribbon.
- Select the file that contains the macro from the Macros In drop down.
- Select the macro from the list box.
- Press the “Options…” button.
- Type the letter in the Shortcut key box that you want to assign the macro to. All shortcuts will start with Ctrl. You can hold the Shift key while typing the letter to create a Ctrl+Shift shortcut. This is usually recommended because most of the Ctrl+key combinations already have dedicated keyboard shortcuts in Excel.
- Press OK and close the macros window.
- You can now press the shortcut key combination to run the assigned macro.
#14 – Check That a Range is Selected
Sometimes you will want to make sure the user has a range (cells) selected before your macro runs. If they have a shape (chart, slicer, etc.) selected then this might cause errors in your code.
For example, I have a macro that deletes the blank rows in the selected range. For this macro to run properly the user needs to have a range of cells selected first.
Here is code that will check if a range is selected.
'Check that a range is selected
If TypeName(Selection) <> "Range" Then
  MsgBox "Please select a range first.", vbOKOnly, "Select Range"
  Exit Sub
End If
The TypeName function returns the data type or name of the object for a given variable or object. In this case it evaluates the Selection and returns the type of object that is selected. If it's not (<>) a range, then the If statement is true.
You typically want to put this at the top of the macro. If a range is NOT selected then a Message Box (pop-up window) will appear that instructs the user to select a range. The Exit Sub line will end the macro.
#15 – Ctrl + Y to Delete a Line of Code
In the VB Editor, Ctrl+Y deletes the line of code that the text cursor is in.
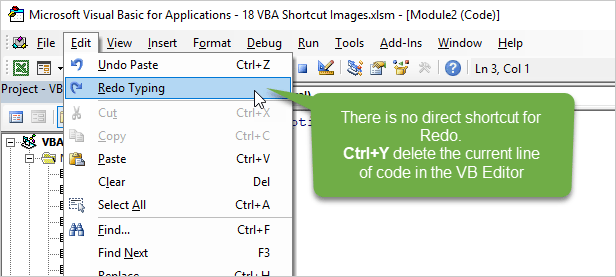
This creates a lot of confusion since Ctrl+Y is typically used for the Redo command in almost every other application, including Excel!
If you look at the Edit menu in the VB Editor you will see that there is no dedicated shortcut for Redo. We can use Alt, E, R as an alternative shortcut for Redo.
This is just one of those weird quirks of VBA that is really good to know.
#16 – Ctrl + i for Quick Info
This is another great keyboard shortcut to know. Ctrl+i displays the screentip that you see writing or running code. This allows you to see all the parameters in a property, method, or function.
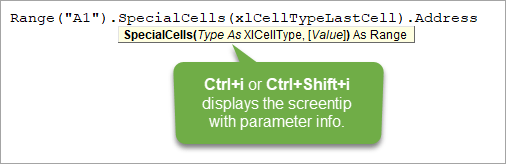
To use the Ctrl+i shortcut:
- Place the text cursor in the word you want to display the info screentip for.
- Press Ctrl+i.
- The screentip will appear.
- Press Escape to close it or move the cursor.
If you have variable selected within a line and you want to see the parameter info instead of the variable's value/data type, then press Ctrl+Shift+i to see parameter info.
#17 – Ctrl+J Opens the Intellisense Drop Down
The Ctrl+J shortcut will open the Intellisense drop down menu that displays a list of objects, properties, methods, variables, etc.
I typically use this when I've typed a partial line of code and ended it with a period, like Range(“A1”).
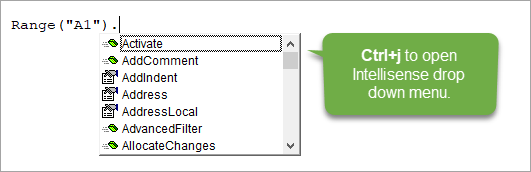
I then want to come back to that line and see the Intellisense drop down. Pressing Ctrl+J opens the menu. Otherwise, you have to delete the period and type it again.
We can also use Ctrl+J to select a different variable from the list. If you used the wrong variable name somewhere, or need to change it, hit Ctrl+J to see a list of the variable names. If you prefix your variable names (aka Hungarian notation), then the other variables should be pretty close by in that list.
#18 – Worksheet Functions
Did you know we can use worksheet functions in VBA? These are functions we use in a formula in Excel like: vlookup, match, countif, max, min, etc.
Type WorksheetFunction. in a macro to see a list of all the Excel functions that are available in VBA.

This is the best of both worlds in my opinion. We can use the power of Excel functions in our VBA code.
The screentip for the function shows the number of arguments, but it does NOT show the names of the arguments. So we typically need to type a formula in Excel to determine what each argument is (unless you have them memorized).
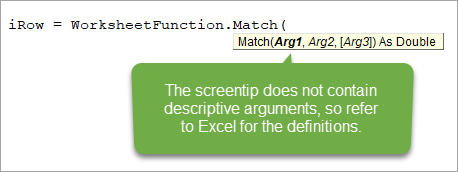
The worksheet function I use the most often in VBA is Match. We can use Match to lookup a value and return the row or column number of the cell that contains the matching value. This can sometimes be easier then using the Range.Find method. Checkout my article & videos on how to find the last used cell on a sheet for more on the Range.Find method.
Download the PDF
Here is a printable PDF version of the article.
What Is Your Favorite Shortcut or Tip for VBA?
I hope you enjoyed that list and learned something new. Maybe this has inspired you to learn more about macros & VBA. If so, please check out my free upcoming webinar on “The Modern Excel Blueprint”.
I would also like to know what your favorite tip or shortcut is that was not included in this article. Please leave a comment below and share yours. There are no right or wrong answers, and this will be a great way to learn from everyone.
Thanks again for your support and I wish you all the best in 2018! 🙂


Happy New Year Jon! Once again you have provided an invaluable resource of Excel information. All of your articles are deeply informative and presented in an appealing graphic manner.
Thanks for sharing your skills!!
Bob Bacon
U.S.A. – Idaho
Thank you Bob! I really appreciate the nice feedback and your support! 🙂
Thank you for all the makro tips 2018…its usefull for me.
I create a lot of macros that import data from one workbook and put it in another. In order to identify the columns in the import and target workbooks, I use public Excel constants:
Public Const intImportFirstNameCol as integer = 1
Public Const intImportLastNameCol as integer = 2
and in the target file:
Public Const intDataFirstNameCol as integer = 4
Public Const intDataLastNameCol as integer = 5
and so on.
First, it means I can use Cells(Row,Col) to identify a value.
Second, when the import or target file format changes (as they often do for my clients), I change the constant value and all my code is immediately up to date:
Public Const intImportFirstNameCol as integer = 23 ‘1 Changed 1-11-18
Public Const intImportLastNameCol as integer = 24 ‘2 Changed 1-11-18
This has saved me hours of programming and debugging time.
Third, by making them Public, I can refer to them in any subroutine or function I need to. Constants that I want to keep private, I declare in the specific subroutine.
P.S. I use longer names, as shown above, to correspond to the meaning of each column. Takes a little longer to type, but clearly documents what data I am referring to.
Donl, you usually place your constants at the top of the particular module you’re working in or do you create their own separate module?
I put them at the top of the module. I create one module for each client project typically, so it is easier to simply export/import the module. Declaring them Public makes them available to any module. I’ll often use the company name as part of the constant (intABCFirstName) to help distinguish and keep separate.
Great tips reference Jon, very much appreciated..:-) For my best tip I would recommend the use of fully qualified statements when the syntax supports it. It is along the same line of thinking expressed in your comments tip. You never know who, or what the skill level is of the person that will follow you and take up responsibility for your code. Troubleshooting code and particularly data problems that casue errors are easier accomplished if you don’t have to spend excessive amounts of time determining exactly what the object hierarchy is that any given line of code is executing against. For long sub procedures that execute on multiple workbooks and worksheets in the workbooks real worksheet names are particularly useful in your statements. I have found that descriptive variables names for workbooks are generally easy enough to follow.
While the cursor is pointing at a subroutine that is being called use Shift+F2 jump to that subroutine in the code.
And Ctrl+Shift+F2 jumps back to where you started.
i was so cool with the shortcuts and i plead for Excel basic shortcuts if possible. Thanks so much
My favourite tip is to use the “Compile VBAProject” from the “Debug” menu item.
Just click on “Debug” and the the option “Compile VBAProject”. That picks up all errors before running or stepping through a Sub. It has saved me loads of time and trouble over the years.
Best regards,
Ben
Great tip! Thank you Ben! The keyboard shortcut to Compile VBAProject is Alt, D, L.
I’m a long-time coder in VBA (Word, Excel, Access) but did NOT know about the IntelliSense invokers (3, 4, 16, 17) or WS functions (18). Way cool stuff (as always)!
#2 – Store Your Macros in The Personal Macro Workbook is my personal favorite, although all of the tips are great! It is truly like having a tool belt for automating common tasks in Excel. Thank you!
“Worksheets” may not give you the IntelliSense you expect.
Your screenshot shows “Worsheets”, which also will not.
Thanks for pointing that out Jon! 🙂
Thanks Jon, for these great tips. I use some of them and good to know the rest which are very handy. My favourite tips are Macro recorder and For-Next loops. They are very powerful, particularly when using pivot tables and slicer.
Keep up the good work, Jon.
I am just beginning to write macros and saved the ones I wrote to the “personal workbook”. When I try to edit any of the macros in the Personal Workbook I am asked to unhide it. How do I unhide a Personal Workbook?
Thanks.
Use Visual Basic editor (Alt + F11) to access and edit your macros
Thank you Jon!All of your makro tips 2018. Its usefull for me.
Thank you Sir! I really appreciate the nice feedback and your support!
I would like to learn excel and Via
I’m using it normal
How to start
Thought you might like this. I have been using MS Office from the 80’s and teaching it for the last 18 years. Many changes in that time. I find your ideas to be first class. Thanks.
Cancel Excel Print Task
You will not always want users to be able to print data, (confidential data is an example).This can be achieved by using VBA.
Add the procedure to ThisWorkbook module.
Private Sub Workbook_BeforePrint(Cancel As Boolean)
Cancel = True
End Sub
You can add a message box, which would remind the user that printing this workbook is not allowed.
Enter this single line of code:-
MsgBox “Printing not allowed”
Full statement
Private Sub Workbook_BeforePrint(Cancel As Boolean)
Cancel = True
MsgBox “Printing not allowed”
End Sub
If someone attempts to print the sheet it will result in a message box on the Excel sheet.
Great tip.
how to call python script in vba
Very nice… like you Jon, I try to learn something new in excel each working day. A quick way to navigate a module is Ctrl + Up Arrow or Down Arrow. This allows you to go from one subroutine to the next or previous. You had a lot of great information listed here!
Thank you for this!!!
Hi Jon!
This is a super collection of tips. I learned quite a few tricks that I can use right away (TypeName, Ctrl-i, Ctrl-j and the explanation for worksheet Intellisense).
My favorite shortcut doesn’t originate in Excel: I create boilerplate code snippets in CodeSmith and paste them into the IDE.
This saves massive time when building classes. I take advantage of CodeSmith’s argument replacement powers to generate a bunch of Get and Let properties in one go. (If I want a read-only property, I simply delete the Let portion that was generated.)
Cheers,
Mitch
Than you John I am just a beginner in excel I am learning a lot from your webinar
#15 – “including” Excel, or “excluding”?
For tip #13 – Assign a Keyboard Shortcut to a Macro,
When I went to that option (Excel 2016) to make a keyboard shortcut it only showed Ctrl +
I entered Ctrl + Shift + f but it wouldn’t take.
The key is to NOT press the Ctrl key. The Ctrl appears to be default so all you need do it press Shift + f (or whichever key you want to use). After you press Shift+v (then Enter? I don’t recall) it shows the image Jon put in the tip with the Ctrl + Shift + F.
Hi Jon,
How can we customize the Symbol or get a new icon not in the list?
I do it via xml editor, is there another way?
Thank you.
Hello Jon
I think I do have a little bit different explanation why “IntelliSense” doesn’t work for “Worksheets”:
The reason why “IntelliSense” doesn’t work for “Worksheets” is, because the property “Worksheets” is of type “Sheets”.
“Property Worksheets As Sheets”
But “Sheets” include ALL types of possible Excel sheets:
xlChart, xlDialogSheet, xlExcel4IntlMacroSheet, xlExcel4MacroSheet, and xlWorksheet
But “IntelliSense” only could “work” for ONE of these sheet types, because they do have different methodes and properties.
That’s why you need to declare a “well typed” variable of ONE of these sheet types only to get “IntelliSense” for this variable
best regards
Kurt
Excel VBA coach
Jon is there any way to make a keyboard shortcut longer? Instead of Ctrl+shift+A, I would like to be able to assign A1, A2, A3 etc. I have a specific application for this and I need to give each letter several macros. In total I want to write approx 360 macros.
I appreciate any help you might be abl to give me on this.
thank you…
excuse me! I have a favor to ask. My project window and property window fonts are so small so that how could I reset it on my MAC AIR system?
Please reply to me when you are spare, thanks a lot.
Great tips! I’ve been looking for ways to streamline my workflow in Excel, and these VBA macro shortcuts will definitely help. Thank you for sharing!
Great tips! These shortcuts are going to save me so much time when working with Excel VBA. Can’t wait to implement them in my projects! Thanks for sharing!
Great post! These Excel VBA macro shortcuts are incredibly helpful for streamlining my workflow. I especially love the tips for debugging—definitely going to implement those in my next project. Thanks for sharing!
This post is a goldmine! I never knew how much time I could save with these Excel VBA shortcuts. The explanations are clear and easy to follow. Can’t wait to start implementing these in my daily tasks. Thanks for sharing!
Great tips! I love using Excel VBA to streamline my tasks, and these shortcuts are going to save me a lot of time. Thanks for sharing!
Great tips! I particularly love the shortcut for quickly inserting a new module. It has already improved my workflow. Thanks for sharing these helpful shortcuts!