Bottom line: Learn how to use a macro to create new windows and apply the existing gridlines, freeze panes, and headings settings.
Skill level: Intermediate
Video Tutorial
Download the Excel File
The example Excel file that contains the VBA code can be downloaded below.
Gridlines & Freeze Panes Disappear in a New Window
In a previous post I shared how to use the New Window feature in Excel to compare different worksheets in the same workbook. This is a popular post, and some people will be using this tip everyday.
However, as Jack and Tom pointed out, some settings like freeze panes and gridlines will NOT be transferred to the new window.
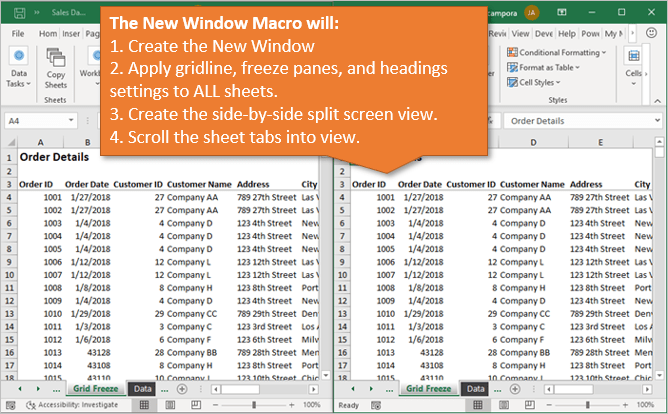
Here's an example. The original window on the left has gridlines turned off and freeze panes applied under row 1. The new “- 2” window on the right does not retain these settings.
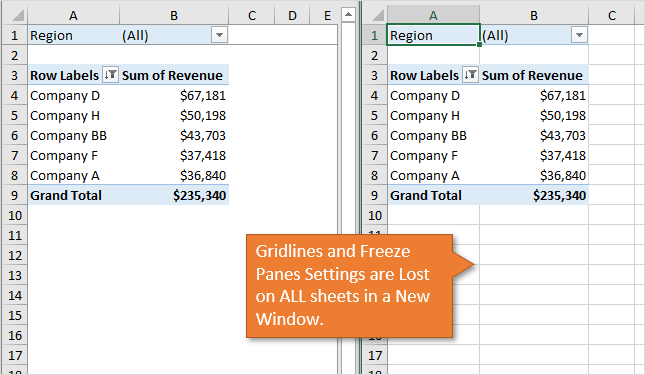
If you close the original “- 1” first and/or save the additional “-2” window, then this will override any changes made to the window settings.
It's IMPORTANT to note that we are ONLY referring to these window level settings (freeze panes, gridlines, headings). Changes to the data and objects within the workbook will be applied immediately to all open windows of the same file. You don't have to worry about losing data or modifications you make to the workbook when two windows are open.
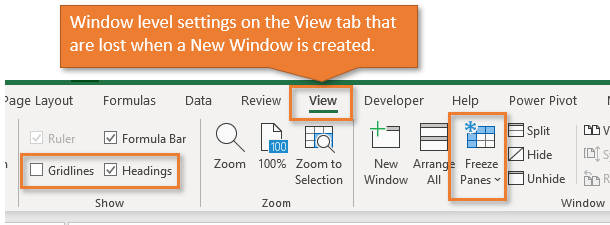
Which settings are changed?
Some window level settings will revert back to the default settings when the new window is created.
- Gridlines: The gridlines will default back to being enabled for all sheets.
- Freeze Panes: Any freeze panes applied to a sheet will be removed.
- Headings: If you turned the row/column headings off for any sheet, those will also be turned on.
These settings can be found on the View tab of the ribbon.
Losing these settings can be frustrating. It can be VERY time consuming to set them back to how you had them originally. So I created a macro that will help save you time when creating new windows.
The New Window Macro
The goal of this macro is to save time with creating a new window by applying existing window settings to all sheets in the new window. It can also create the split screen view.
I have another macro below that will close the new window(s) in the proper order and restore the maximized view of the original window.
How the macro works
Here's what the New Window Macro does:
- Creates the New Window.
- Loops through all sheets in the new window and applies all of the following settings from the original window: Gridlines, Freeze Panes, and Headings. The macro identifies the cell (row/column) that the freeze panes are applied to and applies it the same way to the new window.
- Activates the original sheet in the original and new window. The sheets must be activated in the loop to apply the window level settings.
- Arrange the windows in vertical side-by-side split screen view. This uses the Arrange method (Arrange All button).
- Scroll to the active tab in the workbook so you can view it. The split screen can cause the active sheet tab to be out of view. So this prevents you from having to scroll to find it.
The New Window Macro VBA Code
The example workbook in the downloads section above contains the VBA code.
Sub New_Window_Preserve_Settings()
'Create a new window and apply the grid line settings
'for each sheet.

Dim ws As Worksheet
Dim i As Long
Dim iWinCnt As Long
Dim bGrid As Boolean
Dim bPanes As Boolean
Dim bHeadings As Boolean
Dim iSplitRow As Long
Dim iSplitCol As Long
Dim iActive As Long
Dim iZoom As Long
Dim sSep As String

  Application.ScreenUpdating = False

  'Store the active sheet
  iActive = ActiveSheet.Index

  'Create new window
  ActiveWindow.NewWindow
  iWinCnt = ActiveWorkbook.Windows.Count

  'Set the separator based on the version of Excel
  'Office 365 now using a dash
  If InStr(":", ActiveWorkbook.Name) > 0 Then
    sSep = ":"
  Else
    sSep = "  -  "
  End If

  'Loop through worksheets of original workbook
  'and apply grid line settings to each sheet.
  For Each ws In ActiveWorkbook.Worksheets
    Windows(ActiveWorkbook.Name & sSep & "1").Activate
    ws.Activate

    'Store the properties
    bGrid = ActiveWindow.DisplayGridlines
    bHeadings = ActiveWindow.DisplayHeadings
    iZoom = ActiveWindow.Zoom

    'Get freeze panes
    bPanes = ActiveWindow.FreezePanes
    If bPanes Then
       iSplitRow = ActiveWindow.SplitRow
       iSplitCol = ActiveWindow.SplitColumn
    End If

    'Activate the new window and sheet in loop
    Windows(ActiveWorkbook.Name & sSep & iWinCnt).Activate
    Worksheets(ws.Index).Activate

    'Set properties
    With ActiveWindow
      .DisplayGridlines = bGrid
      .DisplayHeadings = bHeadings
      .Zoom = iZoom
      If bPanes Then
        .SplitRow = iSplitRow
        .SplitColumn = iSplitCol
        .FreezePanes = True
      End If
    End With
  Next ws

  'Activate original active sheet for the new window
  Worksheets(iActive).Activate

  'Activate the original active sheet for the original window
  Windows(ActiveWorkbook.Name & sSep & "1").Activate
  Worksheets(iActive).Activate

  'Split Screen View (optional)
  'The following section can be commented out if you don't want split screen.

    'Turn screen updating on for split screen
    Application.ScreenUpdating = True

    For i = iWinCnt To 1 Step -1
      Windows(ActiveWorkbook.Name & sSep & i).Activate
    Next i

    'Split view side-by-side vertical
    ActiveWorkbook.Windows.Arrange ArrangeStyle:=xlVertical

    'Scroll to active tab in original window
    ActiveWindow.ScrollWorkbookTabs Position:=xlFirst
    ActiveWindow.ScrollWorkbookTabs Sheets:=iActive

    'Scroll to active tab in new window
    Windows(ActiveWorkbook.Name & sSep & iWinCnt).Activate
    DoEvents
    ActiveWindow.ScrollWorkbookTabs Position:=xlFirst
    ActiveWindow.ScrollWorkbookTabs Sheets:=iActive

End Sub
Macro to Close the Additional Windows
As I mentioned above, it's best to close the additional “-2”, “-3”, etc windows first so you don't lose any window settings. If working in split screen, you will likely want to maximize the original window as well.
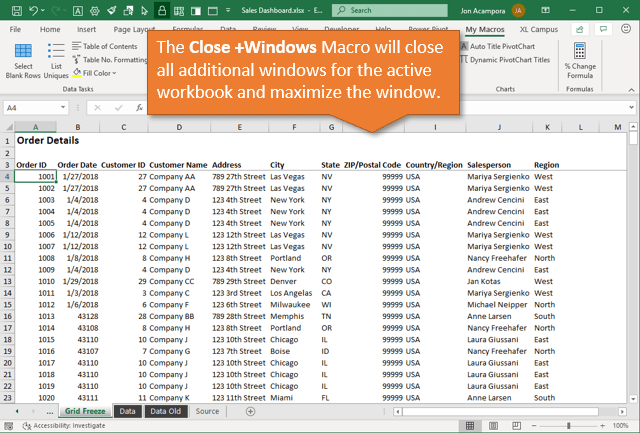
I created another macro that does all this with the click of a button.
Sub Close_Additional_Windows()
'Close additional windows and maximize original

Dim i As Long
Dim sSep As String

  'Set the separator based on the version of Excel
  'Office 365 now using a dash
  If InStr(":", ActiveWorkbook.Name) > 0 Then
    sSep = ":"
  Else
    sSep = "  -  "
  End If

  If ActiveWorkbook.Windows.Count > 1 Then
    For i = ActiveWorkbook.Windows.Count To 2 Step -1
      Windows(ActiveWorkbook.Name & sSep & i).Close
    Next i
  End If

  Windows(ActiveWorkbook.Name).WindowState = xlMaximized

End Sub
How to “Install” the Macros
It's best to add these macros to your Personal Macro Workbook so that you can use them on any open Excel file. Here are the basic setup steps.
1. Add the code to your Personal Macro Workbook
The first step is to add the code to your Personal Macro Workbook (PMW). You can do this by dragging the m_Window module from the example file into your PMW in the VB Editor.
Here is an article that explains how to copy/import VBA code between files.
If you don't have your PMW setup yet, then checkout my video series on getting started with the Personal Macro Workbook.
2. Add a Macro Button or Shortcut
Next you can add a macro button to the ribbon or Quick Access Toolbar (QAT) to run the macro. This is optional, but makes it much easier to quickly run the macros.
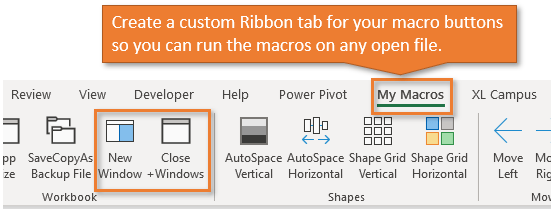
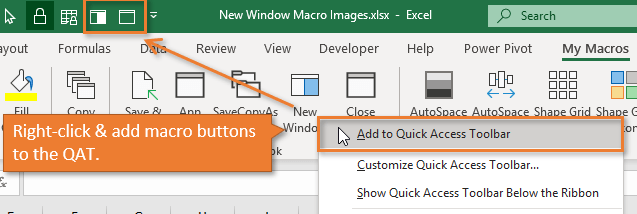
You can also create a custom keyboard shortcut to run the macro.
Please Fix This Issue!
I believe this issue with the window level settings is a bug that needs to be fixed. Here is a post on the Excel Uservoice site where you can vote for it.
Conclusion
The New Window button is a fantastic feature that allows us to compare two or more sheets in the same workbook. However, the issue with losing the window level settings can be frustrating and time consuming.
I hope this set of macros saves you time when creating new windows. The macros can be modified to fit your needs. Please leave a comment below with questions or suggestions.
Thank you! 🙂


The new window macro is a great idea but it is giving me Run-time error ‘9’ “Subscript out of range” when executing the following code:
‘Activate the new window and sheet in loop
Windows(ActiveWorkbook.Name & ” – ” & iWinCnt).Activate
While in the VBE I can see the variable iWinCnt equals 2. That appears to be the only variable in the offending line of code yet there are two windows; the original one and the newly created one.
I will continue to review your code but I am hoping you can tell me what is wrong.
Hi Jerry,
Thanks for reporting this. I updated the code to work on older versions of Excel that use the colon instead of dash for the new window name. I believe this was causing the error. The code in the example file has also been updated.
Hi John. Thanks for your very useful tips, including this one. I am a VBA programmer and wanted to try these macros. I found that my Excel doesn’t like your syntax, in the lines that name a Window something like this:
Windows(ActiveWorkbook.Name & ” – ” & iWinCnt)
Wherever you use ” – ” to join the workbook name and number, I had to change it to “:” (5 places in the 1st macro and 1 in the 2nd macro):
Windows(ActiveWorkbook.Name & “:” & iWinCnt)
Then they work great!
I’m using Office Professional 2010, 32-bit.
Sorry Jon, I spelled your name wrong the first time.
Ken, I noticed that some examples on a Microsoft website shows the window name using “file name:1” for the original window and “file name:2″ for the new window. I don’t know the age of those websites so I have no idea if colons are still okay but on my Office 365 system which includes the latest version of Excel the ” – ” works. That said, I too had to make some changes regarding the subscript in the window name. I often have the window caption set to “FullName” so I can see the entire path of the file I am using. As written the macro did not like the the full name and I got a subscript out of range error. Having the macro reset the caption to just “Name” solved only part of the subscript problem. Once I changed the caption, even toggling back to just the “name” the NEW window is -1 and the original window has no subscript, that is, it is only the workbook name. This was easy enough to correct by adjusting the indexing code in several places. The revised macro is running fine for me. I also changed the closing routine to revert back to the original window size and location since I never use a full screen window.
Hi Ken,
Thanks for reporting this. And no worries on the name spelling. 🙂
I updated the macro to check the version and set the separator accordingly. The code in the post and the example file have been updated.
Thanks again!
Referring to my previous post made a few minutes ago: Your macro works fine with another trial workbook. The workbook that creates the crash is a lot more complicated but I don’t see why that would matter.
Hi Jerry,
I’m not sure either. It might be due to different sheet types or something else. It will be difficult to tell without seeing the file.
John,
what does the following part of your code bring about? At first sight, it doesn’t seem to be necessary! At least, I cannot make out a difference after deleting this part.
‘Scroll to active tab in original window
ActiveWindow.ScrollWorkbookTabs Position:=xlFirst
ActiveWindow.ScrollWorkbookTabs Sheets:=iActive
‘Scroll to active tab in new window
Windows(ActiveWorkbook.Name & ” – ” & iWinCnt).Activate
DoEvents
ActiveWindow.ScrollWorkbookTabs Position:=xlFirst
ActiveWindow.ScrollWorkbookTabs Sheets:=iActive
Hi Frank,
Great question! This makes the sheet tab at the bottom visible. If the workbook has a lot of sheets, then the active tab might not be visible at the bottom of the application after the screen is split. Especially if you are working on a laptop or smaller resolution monitor.
If you don’t have this section of code then you will like have to scroll to find the sheet tab.
I’m not sure if this happens on older versions of Excel, but definitely an issue on the current version. So I added this section of code to make the active sheet tab visible at the bottom of the application.
I hope that helps.
Thanks for this Jon – It works great! I have one additional suggestion – retain the zoom level on each page. I updated the code to do that by adding an iZoom variable to store the zoom and then reapply on the new sheet. (I have a wide variety of zoom levels in out workbooks).
I tried copying the updated code here in the comment but it went to a 404 error when I tried to submit.
Great suggestion! Thanks Tom! I’ll add it to the macro when I get a chance.
Just updated it. Thanks again! 🙂
Very very interesting ! Thank you !
I received a runtime error when copying your macro on the following line
Windows(ActiveWorkbook.Name & sSep & “1”).Activate
Run-time error ‘9’:
Subscript out of range
any hep on debugging is much appreciated
I got this error too. I’m on Excel 2016. My window separator is : (at top of Window it’s Filename.xlsm:1 or Filename.xlsm:2 and apparently some versions use a – instead. Just try New Window in Excel and you’ll see what your separator is) and so I had to manually set it… Comment out the entire IF of InStr with : and just add
sSep = “:”
then it worked for me. I left the commented code in case I need it in the future but you could just delete the IF structure and leave the sSep set to colon like above.
I also took out the optional split view at the end because thank goodness for lots of monitors.
Thanks to Jon for writing this. I also voted on Excel user voice. This was driving me crazy today while working in a workbook with 3 or 4 tabs with panes frozen all over the place – only to lose all the settings (and zoom – thanks for adding that) in a new window. I feel like this used to work. -_- UGH! What a waste of time!!! Thanks again. 🙂
that helps a lot…thanks!
I just upgraded to office 365 so now the macro works because my separator is “-“
Fantastic Tip Jon,
I’ve always used a second window, however, had issues with regards to the freeze panes etc.
No more 🙂
AQ
Cheers
I’m getting the same error as Justin (May 9 2019) below; I’m getting a runtime error on
Windows(ActiveWorkbook.Name & sSep = “:”).Activate
I’m running Excel 2013; the separator is “:” i.e. filename:1 and filename:2.
Any advice is much appreciated!
Hi Jon, thank you very much for your macro. I installed it on my personal workbook and it helps me a lot!
I just did one change: your macro is not copying the .view property of the original workbook. This view property can either be xlNormalView, xlPageBreakPreview, xlPageLayoutView.
So I added this parameter to be copied to the new window.
Maybe you should also add it to macro.
Works great, except if the first row on a sheet is hidden. This appears to be a VBA bug. Workaround is to unhide first row, freeze panes, then re-hide first row on when looping through the worksheets. Unfortunately this also required setting ScreenUpdating to FALSE, not sure why. Any better solutions would be welcome.
Looks good, but I get this error everytime:
Run-time error ‘9’:
Subscript out of range
Absolute lifesaver.
A quick ask – some of the users of my models use Macs and this does not work for them (and they break my files).
Specifically, they get an error within the Windows(ActiveWorkbook.Name & sSep & “1”).Activate line.
I assume it is due to the separator used on a Mac version of Office 365 vs. Windows. No luck troubleshooting myself – any suggestions?
Just revisiting this and finally implemented this. Not sure why it took me so long, although am also using new windows to compare financial data all the time. Thanks again for the tip Jon and to everyone else who contributed towards this working Macro!
Wowsers. Well done. I’m annoyed at myself that I never thought of doing this. I work with complicated multi-sheet workbooks which mean that I am forever opening a new window to be able to look at two or more different sheets at once efficiently.
The annoyance at closing the original window rather than the clone is extremely palpable. Apart from the mentioned issues, there is also the loss of any Zoom you have applied. With a lot of sheets where you, out of necessity, have to set specific freeze panes, gridlines, zoom, etc. it is excruciating to have to restore everything. Also, when opening a new window I don’t want to lose those either … there’s a reason that they were set up like that in the first place.
This is such a bug in Excel. There’s no way that anything but a tiny, tiny majority would ever want the current behaviour. I’ve been contending with this for well over 15 years. Time they fixed it.
Thanks again!