Bottom Line: Learn some tips to increase audience engagement and save time when sharing your screen and Excel in virtual meetings. Tips for Windows & Mac and all virtual meeting platforms (Zoom, Teams, GoTo Meeting, etc.)
Skill Level: Beginner
Watch the Tutorial
Download the Help Resource
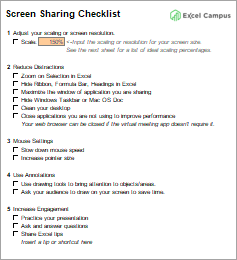
I've created a handy Screen Sharing Checklist as well as a Resolution Calculator for you to download and reference when needed. Both sheets are formatted for printing.
Screen Share Tips
I want to share a few tips with you for screen sharing during virtual meetings so that your audience stays engaged and can clearly see what you are presenting. While some of these tips focus on Excel, they can be used regardless of the content you are sharing or virtual meeting software you are using, and can be used on any screen for both Windows and Mac.
Tip #1 – Adjust Your Screen Resolution and Scale
One of the best things you can do to improve engagement and save time, is make sure the text on your screen is large enough for your audience to read.
This is especially important if you are using a high resolution monitor (4K or Ultra Wide) because it can appear hard to read for attendees that have a smaller screen.
In the video above I shared a chart that shows that 59% of visitors to our website have a screen resolution that's smaller than 1920×1080 pixels. These are typically laptops or older monitors. Here is an example of what a higher resolution monitor can look like to a viewer with a smaller screen.
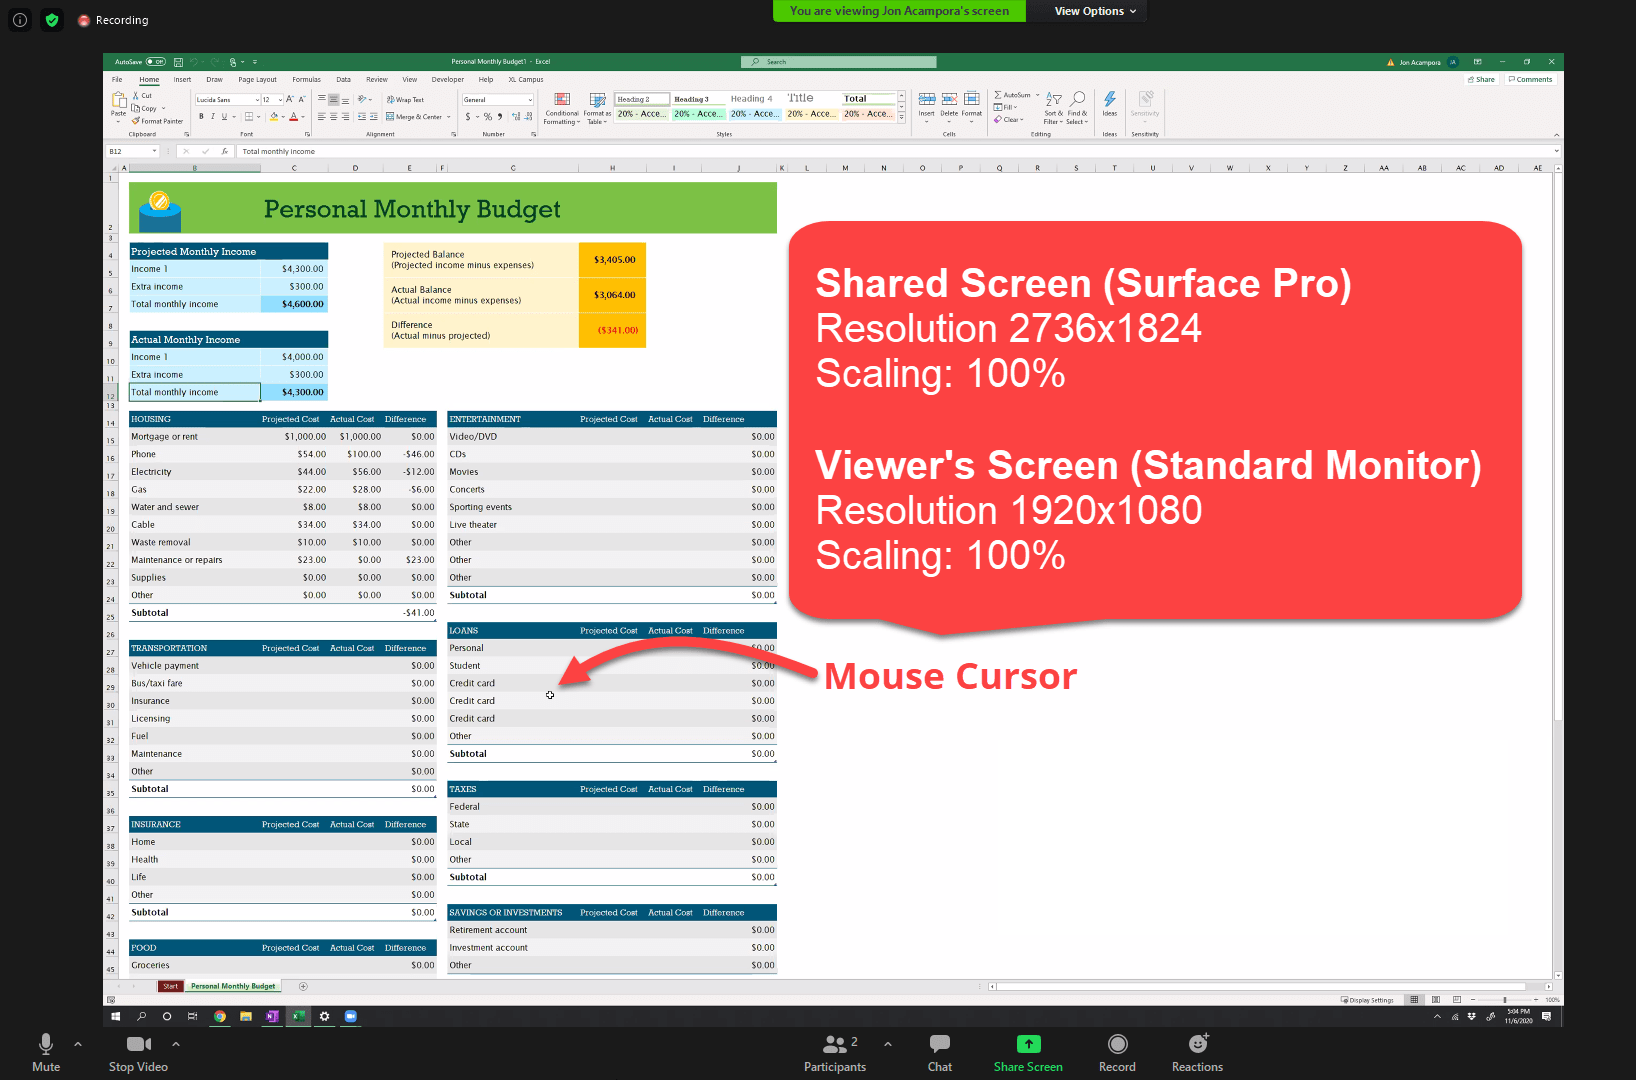
If you don't know your audience's screen size, then it's best to adjust the scaling of your monitor to accommodate for this. I typically adjust mine to display at 1280×720, ensuring everyone on smaller screens (laptops, tablets, phones, etc.) will be able to see what I'm presenting.
To change the scaling/resolution in Windows, just right-click anywhere on your desktop an choose Display Settings.
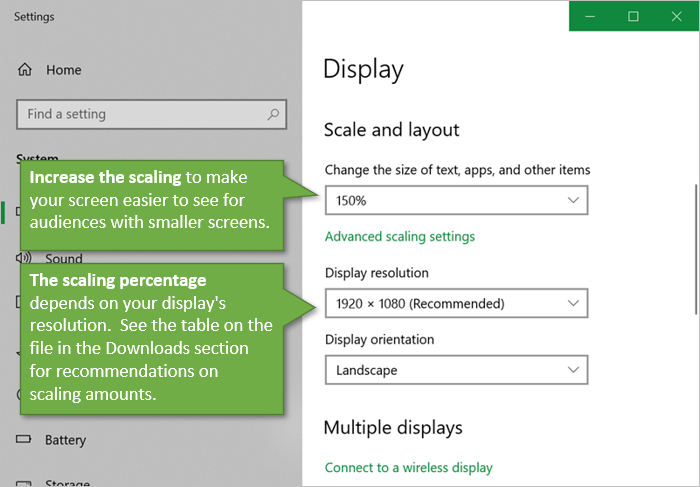
The Scaling will be set to the Recommended amount by default. You can select a larger percentage from the drop-down. For a standard 1080p monitor, I increase the scaling to 150%. This gives you an equivalent resolution of 1280×720. Note: Scaling increases the text and icon sizes without actually changing the display resolution.
The image below includes a table with a list of typical display resolutions and recommended scaling percentages to get your screen to display at 1280×720. This table is in the Excel file in the Downloads section above.
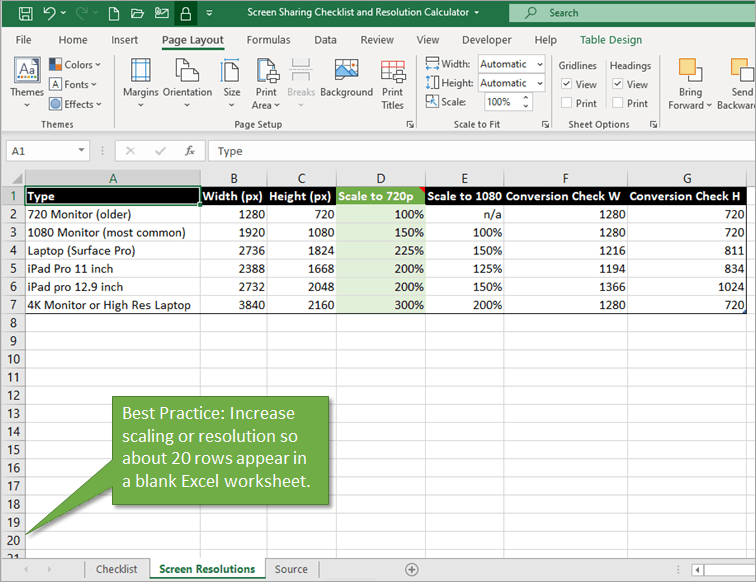
For Excel, a good rule of thumb to know if your resolution/scaling is good for screen sharing is to have about 20 rows showing on your screen in a blank worksheet with default settings.
To adjust the scaling on a Mac, click the Apple button, then go to About This Mac. Click on Display Preferences on the Display Tab. Choose the Scaled button and then select from the default scaling options. See the video above for details.
Tip #2 – Reduce Distractions and Clutter
When presenting, you want to remove anything that might take attention away from the main focus that you are conveying. Here are some tips to reduce distractions:
Draw Attention by Zooming In
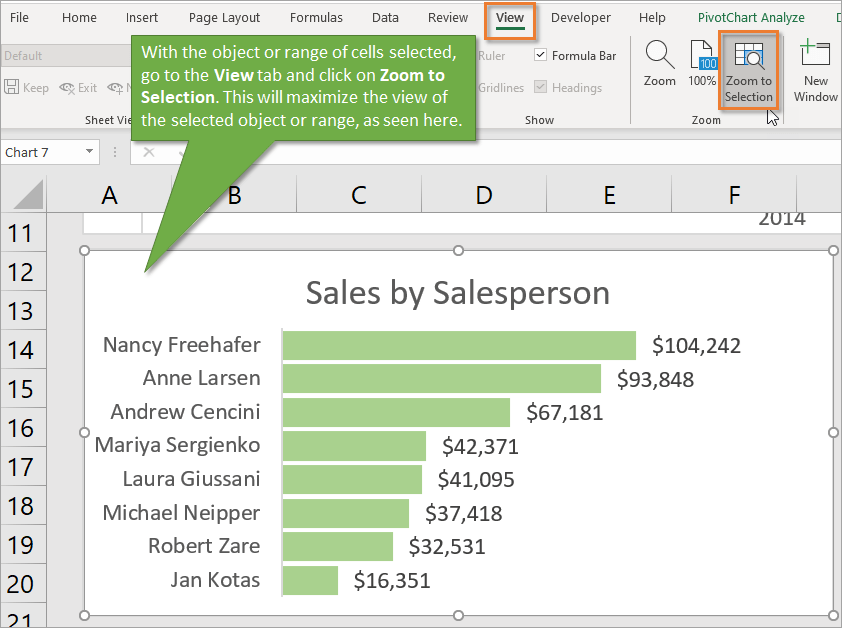
- Zoom in on a specific object or a selection of cells. To do this, just click the Zoom to Selection button on the View tab of the Ribbon. See screenshot below.
- Press the 100% button on the View tab to zoom back out.
- Quickly Zoom in & out by holding the Ctrl key and using the scroll wheel on the mouse. An alternative is to use the zoom option in the bottom right corner of the Excel application window.
Increase Screen Real Estate
- Maximize any windows that you are showing.
- In Excel, collapse or minimize the ribbon by double-left-clicking on any of the Ribbon tabs. You can then click the a ribbon tab to expand the ribbon temporarily. Double-click the ribbon again to return to expanded mode.
- Hide the Formula Bar and Headings by deselecting the appropriate checkboxes on the View tab.
Eliminate Clutter and Distracting Notifications
- Clean your desktop if you will be showing it.
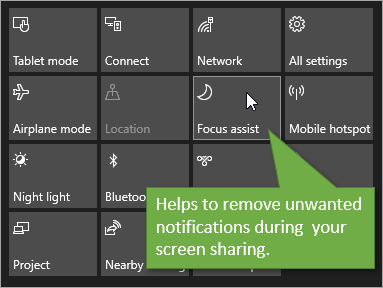
- Turn on Focus Assist mode in Windows to reduce notifications. You can find this option in the Action Center menu that appears when you click the icon in the bottom right corner of your screen.
- Turn on Do Not Disturb mode on the Mac to silence calls and notifications. Turn off notifications from the Notification Center or System Preferences. Here is a help article with more details.
Improve Computer Performance
- Close programs and applications you are not using for the meeting.
- Close your web browser if your virtual meeting is not web based. Virtual meeting software with desktop applications (like Zoom) do not require your web browser to be open.
- If you do need your web browser open, close tabs you are not using.
- Pause syncing on background cloud storage and backup apps like OneDrive, Dropbox, Google Drive, etc.
Tip #3 – Help Your Audience See Your Mouse Pointer
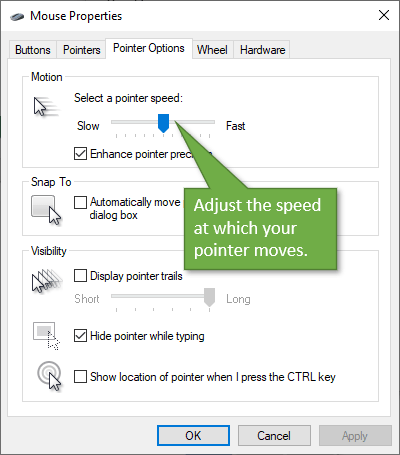
- Slow down your mouse movements. You can do this in Windows by going to Mouse Settings, then Additional Mouse Options. On the Pointer Options tab, you can adjust the pointer speed.
Enlarge the mouse pointer to make it easier to see for your viewers. On Windows, type Mouse Settings from the Start Menu. Click Adjust mouse & cursor size. This gives you an option to choose whatever size mouse works best for you.
To change the Mouse settings on a Mac, click on the Apple button and select System Preferences. Click Mouse. You'll have an option to change the tracking speed there. Under the Accessibility option on the System Preferences menu, you can go to Display to find the option for increasing your cursor size.
See the video above for more details on these settings.
Tip #4 – Use the Annotations Feature
Most virtual meeting apps have an option for annotations. This allows you to draw and type on the screen you are sharing. You'll have a menu of options to choose from, such as drawing lines or shapes, highlighting selections, adding text, stamping, etc.
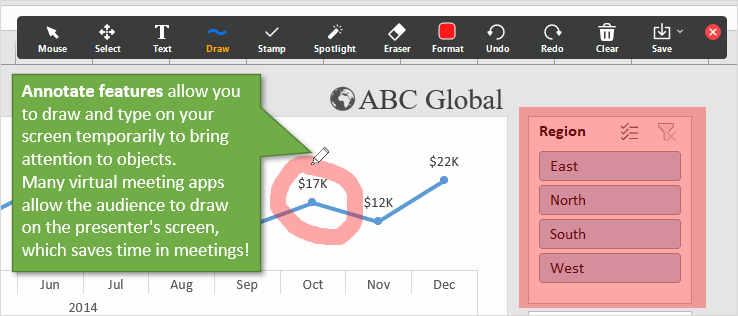
The great thing about these annotations is that they don't modify your file. The annotate feature simply marks your screen for your viewers' benefit.
Some virtual meeting apps (like Zoom) also have an option allowing viewers to draw on the screen being shared. This makes it easy for your audience to point to something on the presenters screen, and can save A LOT of time during meetings.
Tip #5 – Increase Engagement
A few tips for keeping your audience awake and enthusiastic:
- Practice your presentation beforehand.
- Ask and answer questions to keep engagement up.
- Share Excel tips. Everyone loves to learn a new Excel tip or shortcut and your audience will pay attention if they know there are additional benefits to your presentation. Checkout our list of over 270 Excel shortcuts and subscribe to our free email newsletter.
Related Posts
Conclusion
I hope this tutorial gives you more confidence and excitement for sharing your screen during virtual meetings. If you have some tips you'd like to share as well, please leave a comment. I'd love to learn from you!


Thanks, good list. I hope many presenters see it and heed your suggestions
#3 is a big one. I’ve made this suggestion in the comments on many online webinars I’ve attended.
.
Trying to find a tiny mouse pointer on screen to follow along with the presenter is always a distraction. Making the pointer bigger is one suggestion I commonly make. Another is to pick a really LOUD color for it. I like Red, or Violet much better than the default Black & White.
#4″b”, learn your presentation tool and become comfortable using the features. As well as annotation, many tools allow the presenter to zoom in on parts of the screen. I find that really helpful to remove distractions, but it is sad to see presenters fumbling with the tool.
Keep up the good work.
These are great suggestions, Ron! Thank you for taking the time to share.
I agree that it definitely helps to learn the presentation tool and practice. It can save a lot of time and frustration.
Thanks again!
Love your solutions I want little help I have user ID in row and in column I have months I want to know in which month the user has first logging history can you please give provide formula
Thanks Rick! It sounds like you want to find the first non-blank cell in the row. Here is a post from my friend Dave that explains how to do that.
You can then wrap that with the INDEX function to return the month name from the row that contains the months. Here’s our post on the INDEX function.
I hope that helps. Thanks again and have a nice day! 🙂
Thanks So much Jon, I love to learn new tricks and your presentations and teaching style is awesome! Thanks for all the welcome advice.
Regards,
Michelle
Thank you, Michelle! I appreciate the nice feedback and am happy to hear you are learning new tricks. 🙂
Thanks Jon,
Good gen. I will send a link to this vid to my work colleague’s as their office xmas gift 🙂 Teams, and, to a lesser extent, Zoom, are the weapons of choice.
All the best mate.
Thanks Jon for this
is there any way to automate this and the reset it after the session?
It will help me.
I slow down the mouse cursor on every computer I use, Windows default is crazy fast so on a video chat…ugh!
Tips 1 and 2 were awesome, you never think about the screen size of others.
The quick zoom is something new to me, AWESOME!!! Thank you for helping me with my goal of learning something new everyday and first thing in the morning, I will be using this.
Thanks
By following above mentioned tips and using tools like webex, gotomeeting, R-HUB web video conferencing servers etc. one can successfully share screens during virtual meetings.
You are the best. Recently got my windows 10 machine and I was using mac all these years. screen sharing was bit confusing at first, but your tips helped me save time.
Robin.