Bottom line: Learn how to create custom shortcuts to move the selection to an adjacent range. This technique is great for selecting rows or columns that contain blank cells.
Skill level: Intermediate
Select Adjacent Rows or Columns
Have you ever wanted to quickly select a row or column next to the current selection? The following screencast shows an example.
There are other ways to do this natively in Excel using a combination of shortcuts. For example, we can move the selection one column to the right using the following shortcut sequence: Shift+Right Arrow, Tab, Shift+Right Arrow
That only works if one row or column is selected, and is a lot of keystrokes. So, in this post I share a way to accomplish this same task with a single keyboard shortcut or button press.
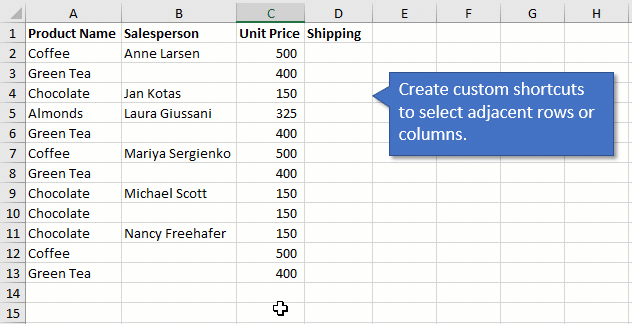
This is very useful when you want to select an adjacent row or column that contains blank cells. In a previous post & video I explained 2 ways to select rows/columns with blanks. That included using an Excel Table or a macro.
The Move Selection Macros
This technique uses a set of four very simple macros.
The Range.Offset property allows us to reference the range to above, below, left, or right of the current selected range (Selection). We can use the RowOffset and ColumnOffset parameters to tell Offset how many rows or columns to move.
Selection.Offset([RowOffset], [ColumnOffset])
MSDN help page for Range.Offset
In this case we only want to move one row or column, so we will set the RowOffset or ColumnOffset parameter values accordingly.
Download the Excel File
You can download the file that contains the macros here.
Video: How to Add Code to Your Personal Macro Workbook
The Macro Code
Here are the macros that you can copy/paste to your Personal Macro Workbook. Checkout my video series on How to Create a Personal Macro Workbook.
Sub Move_Selection_Right_Column()
'Moves selection one column to the right

  On Error Resume Next
    Selection.Offset(0, 1).Select
  On Error GoTo 0

End Sub

Sub Move_Selection_Left_Column()
'Moves selection one column to the left

  On Error Resume Next
    Selection.Offset(0, -1).Select
  On Error GoTo 0

End Sub

Sub Move_Selection_Down_Row()
'Moves selection down one row

  On Error Resume Next
    Selection.Offset(1, 0).Select
  On Error GoTo 0

End Sub

Sub Move_Selection_Up_Row()
'Moves selection up one row

  On Error Resume Next
    Selection.Offset(-1, 0).Select
  On Error GoTo 0

End Sub
On Error Resume Next is used to bypass any errors that are raised when the first/last row/column in the sheet is selected, and the user presses the shortcut to select a row outside the sheet.
How to Run the Macros
There are a few options for calling/running the macros.
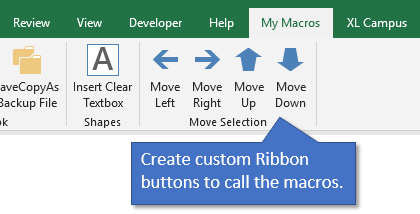
Custom Ribbon Button
We can assign the macros to custom macros buttons on the Ribbon. Checkout the 3rd video in the series on the Personal Macro Workbook for step-by-step instructions on how to create the buttons.
Keyboard Shortcuts
We can also assign keyboard shortcuts to the macros. Typically the macro shortcuts start with Ctrl or Ctrl+Shift, and can be assigned in the Macro Options window. However, we can also create shortcuts to start with a different key by using the Application.OnKey method.
The following macro creates the keyboard shortcuts that start with the Alt key. We use a combination of Alt, Shift, and directional arrow keys to call the shortcuts.
This macro needs to be run once every time you open Excel. It can be put in the Workbook_Open event in the Thisworkbook module of your Personal Macro Workbook. I explain more in the video above.
Sub Add_Move_Selection_Keyboard_Shortcuts()
'Create keyboard shortcuts to call Move Selection macros
  '% - Alt
  '+ - Shift
  'Help for OnKey Method: https://msdn.microsoft.com/en-us/VBA/Excel-VBA/articles/application-onkey-method-excel

  'Set Alt+Right Arrow to call the macro
  Application.OnKey "%{RIGHT}", "Move_Selection_Right_Column"

  'Set Alt+Left Arrow to call the macro
  Application.OnKey "%{LEFT}", "Move_Selection_Left_Column"

  'Set Alt+Shift+Down Arrow to call the macro
  Application.OnKey "+%{Down}", "Move_Selection_Down_Row"

  'Set Alt+Shift+Up Arrow to call the macro
  Application.OnKey "+%{Up}", "Move_Selection_Up_Row"

End Sub
Worksheets Shapes or Buttons
Another option is to put shapes or buttons on a worksheet that call the macros. This would only be used for specific applications where you wanted to make it easy for the user to select an entire row or column.
What's Your Favorite Technique for Moving the Selection?
I want to thank Ed, a member of the Excel Campus community, for inspiring this idea. It's a very simple solution to a common problem of selecting rows or columns that contain blank cells.
It's also an easy way to move or jump the selection to apply or copy/paste formatting.
What other methods do you use to move the selection. Please leave a comment below. Thank you! 🙂


Jon –
Wonderful set of macros, thanks.
One minor error- you have this comment line in every macro:
‘Move selected cells one column to the right
Of course there should be a different comment for “column to the left”, “row up” and “row down.
Dan
Thank you for letting me know Dan! Appreciate your help. I fixed the comments. 🙂
GR8 Jon. I like this, I learned again and it’s very useful for me! I used the right arrow and then Ctrl+Shft+Down to select ranges, but now I can do it much faster thanks to you!
Awesome! Thanks Edil! 🙂
I use the shortcut of [CTRL + .] to move around the corners of a selected area which then allows you to change your selected area as required easily with the SHIFT and ARROW keys.
Thanks Graham! Yes, that is another good technique! You can also use the Tab key if the selection is just two columns. Ctrl+. works great when the selection is more than two columns.
Jon,
You’re the man! Thank you so much for sharing your knowledge.
Mickael
Thanks Mickael! 🙂
Hi Jon
Hope you are well.
Do you have an spreadsheet file as a test?
Regards
Sab
Hey Sab,
Yes, I just added the file to the page above in the Downloads section. It might take a few minutes for it to update and display on the page. Thanks for asking! 🙂
Great work, Jon.
Thank you for sharing with us.
This is brilliant Jon! Thank you!!
Thanks Jeff! 🙂
Amazing Video
Thanks Manuel! 🙂
Hi Jon,
Thanks for the great idea, just one question, in the Sub Workbook_Open() routine the one line of code is:
Call m_SelectRange.Add_Move_Selection_Keyboard_Shortcuts
Can you explain what is going on with the ‘m_SelectRange’, I must be missing something…
Hi Steve,
I just added another video in the post above that explains how to add the macros to your Personal Macro Workbook, and the Workbook_Open event.
m_SelectRange is the name of the code module that the “Add_Move_Selection_Keyboard_Shortcuts” is stored in. You do NOT have to add this reference to the line of code that calls the macro. In fact, the line of code could be as simple as just the macro name. You don’t even have to use the Call statement.
However, I like to use the Call statement in my macros to make them easier to read. It clearly tells us that the line is calling another macro. As you’ll see in the video, when typing the line of code, using the module name makes it easy to then select the macro name from the intellisense drop-down after I type a dot. This means I don’t have to navigate back to the other code module to copy the macro name.
So, those are just a few shortcuts and tips I use to help make coding a little easier. Again, not completely necessary. I hope that helps. Thanks again and have a nice weekend! 🙂
Hey ! Jon
This is really awesome!
Really appreciated with your sharing. It saves my workload a lot.
Happy to hear it. Thanks JK! 🙂
Clever little routines. Thanks Jon
Thanks Jon, I appreciate the preview you gave for the OnKey explanation!
Next time I need to move selections, I hope to remember the paste buddy’s paste special.
Mostly these selections do not have comments or have the same formatting. So the shortcuts for copying comments or formatting could be used to mark the same range in any other column.
Also Column Width can be used for columns with the same or comparable width.
For rows the Column Width copying would work perfectly – no restrictions whatsoever.
I hope to have soon a chance to use this. 🙂
Sounds great Matthias! Yes, you could definitely combine this with other Paste Special shortcuts that you create with The Paste Buddy Add-in or the Alt+E+S+… shortcuts.
Thanks so much john, it very nice and needs to learn more your teaching.
Hi Jon! I learnt a lot from this thanks. I’m trying to create a VBA macro that can add multiple sheets using feedback from a user inputbox. I’ve create the macro but the sheets are adding in reverse order. For example instead of “Sheet1 then Sheet2, Sheet3, Sheet4”, it is “sheet1 then Sheet4, Sheet3, Sheet2”. What can i do to correct this? Here’s the code.
Sub Add_Sheets()
‘
‘ Add_Sheets Macro
‘ Creates multiple sheets as per user input
Dim myDecision As VbMsgBoxResult
Dim myCounter As Long
myDecision = MsgBox(“Are you sure you want to run this macro?”, vbOKCancel + vbExclamation, “Run Macro”)
If myDecision = vbOK Then
myCounter = InputBox(“How many sheets would you like to add?”, “Input”)
Sheets.Add after:=ActiveSheet, Count:=myCounter
Else
Exit Sub
End If
End Sub
Hi Tekena,
You have “Sheets.Add after:=ActiveSheet” so the active sheet to start is Sheet1. On the first pass, the macro will create Sheet 2 right after (next to) Sheet 1. But then it will create another new sheet (Sheet 3) right after Sheet 1, so now Sheet 2 is “pushed down the line” so you get Sheet 1, Sheet 3, Sheet 2. Then when it creates Sheet4, the same thing happens, you get: Sheet 1, Sheet 4, Sheet 3, Sheet 2. The reason for this is that Sheet 1 is always your active sheet in your code. Maybe what you could try is making the added sheet the active sheet, so it would work like this: Sheet 1, then Excel adds Sheet 2 and makes Sheet 2 the Active sheet. So when it goes to add a new sheet “after the active sheet” it will give you Sheet 3 after Sheet 2, so it will be: Sheet 1, Sheet 2, Sheet 3 and so on. So one strategy you could use is adding a sheet after the active sheet, but then immediately make the added sheet the active sheet, that way when Excel goes to add a new sheet after the active sheet, it will go in order, 1 2 3.
Hi Jon,
I recently switched to Office365 ProPlus, and in this version, when I use Shift+Arrow to select a range of data, the active cell no longer moves to the end of the selection, instead staying at the beginning of the range. This is incredibly limiting when I’m hoping to select specific subsets of data where the complete dataset is larger than the active window. Is there a way to turn this setting off, returning to the previous function (where the active cell moves with the range selection)?
Sorry – to clarify, I’m using CTRL+SHIFT+ARROW.
Hey Jon
This is working only one time in my excel book. When i closed all worksheet then this is automatically un execute from excel window. I want to execute this program permanently in my ms office. What can i do for this.
Thakur
Jon,
Thank you. Very helpful! I have many rows hidden via autofiltering at times and many times I may have whole columns hidden. I’m not a VBA person at all but with some googling I cobbled together this which I added so when the next set of cells happen to be hidden it keeps going until it get’s to cells that aren’t hidden. It may not be pretty or completely correct but seems to be working…
Instead of:
Selection.Offset(0, 1).Select
I now have:
Selection.Offset(0, 1).Select
Do Until Selection.EntireColumn.Hidden = False
Selection.Offset(0, 1).Select
Loop
For Rows use EntireRow instead of EntireColumn and modify the Offset as would be appropriate for whether moving left, down or up as the example is just for the moving right case.
I welcome any improvements or thoughts. Thanks! David
Jon,
One issue I haven’t figured out… Last week when testing this the use of the + for shift to add to the % for alt to make for OnKey Alt+Shift+Down Arrow or Up Arrow worked for me. This week the + for shift key isn’t being recognized and so that key combo isn’t working for me. I removed the + so I’ve just got Alt+Down Arrow and Alt+Up Arrow now as my OnKey settings and that works though I’m guessing I’ve overwritten some other built-in excel keyboard short cut (I don’t really know). Perhaps I’ll try rewriting and returning to the original code after some future restart of Windows and fresh Excel session to see if I can regain the original feature/function. Any thoughts on this certainly are welcomed. Thank you. David
I am using Office 2016 for a Mac. The macros work when executed from the macro menu but I cannot get the keystrokes to work. I suspect that the problem is with Sub Add_Move_Selection_Keyboard_Shortcuts() but don’t see how to modify it for a mac.
For copying and pasting a range of cells repeatedly down a column(s) use Opt-Return or Shift-Opt-Return to go up.
Example using range of four cells A1:B2, select the range, Copy, Opt-Return, Paste and it will paste the contents of A1:B2 into A3:B4. Repeat as needed. If you are trying to fill a large area, increase your selection from 4 cells to 8 or 32 cells etc. as you go to make your copy size larger and fill faster.
This is a massive timesaver Jon. Thank you so much for this. I have added it to my personal.xlsb file and am using it across a report that requires massive checks. However, I have noticed that when I want to move the selection horizontally to the right, the selection moves but I have to manually scroll to the right to carry on moving the selection. Is it possible to develop a script that scrolls as well please in the direction in which I am moving my selection?