Bottom Line: Learn how to view and compare two worksheets in the same workbook with the New Window feature, split screen view, and synchronous scrolling.
Skill Level: Beginner
Video Tutorial
Make Comparisons Between Sheets Easier
Sometimes we need to flip back and forth between two worksheets in order to compare numbers, copy and paste entries, or create formulas. In these instances, it can be much easier to look at the two (or more) sheets side by side.
To accomplish this, we can use the New Window feature in Excel, as well as some desktop shortcuts to create a split screen view of the the sheets we want to look at simultaneously. It's a fairly easy habit to pick up and will save you lots of time and frustration in the long run.
Creating a New Window
We can view two or more sheets from the same workbook by using the New Window feature.
To make a new window, go to the View tab on the Ribbon and press the New Window button. This will create a new window of the active workbook (the workbook you were viewing when you pressed New Window).
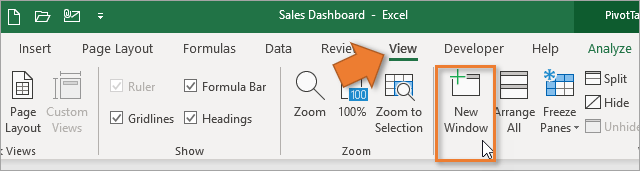
The keyboard shortcut to open a new window is Alt + W + N.
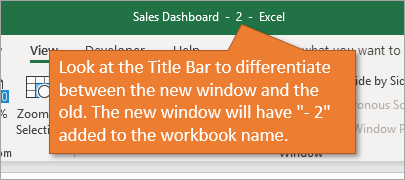
Once you've created a new window, you can differentiate between the new and the old by looking at the title bar at the top. The new window will have a dash and the number 2 (then 3, 4, 5 and so on as you continue to open new windows).
Changes are Synced Between Windows
Keep in mind that you are NOT creating a duplicate file, just a new window to look at the same file. Any change you make to the workbook in one window will be reflected in the other. It does NOT matter which window you make changes in. All windows will be updated immediately.
Toggling Between Windows
You can now select a different sheet in the new window to view and edit it. You can then quickly flip between windows by using the Alt + Tab
keyboard shortcut. Hold Alt, then press and release Tab.
This is a very handy shortcut that makes it easy to flip between windows (sheets) when doing common actions like copy & paste.
Create a Split Screen View
To tile the windows side by side, you can simply click on the title bar and then drag the window to the right of the screen. If you have multiple windows open on your computer, you may have to select which window you want to view on the left.
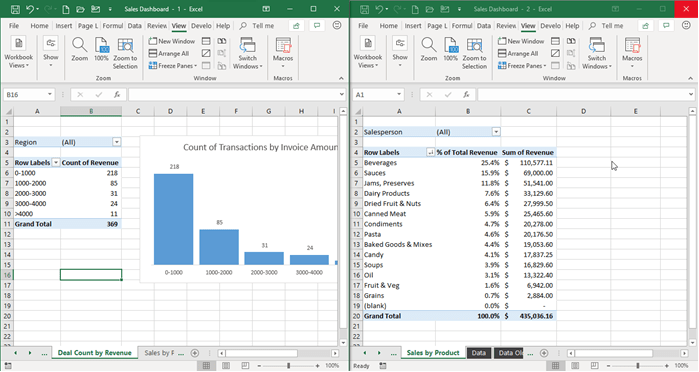
I've written a whole post about tips for split screen usage for both Windows and Mac users. I encourage you to check it out and see how you can improve your productivity game with split screens.
Note: This behavior is slightly different in Excel 2010 and earlier. See the section below for details.
Synchronous Scrolling
One cool feature to employ while using a split screen is that you can scroll both sheets at the same time. This is especially helpful if you need to compare line by line, looking for differences in similar sets of data.
To turn on synchronous scrolling, just go to the View tab on the Ribbon and choose the Synchronous Scrolling button.
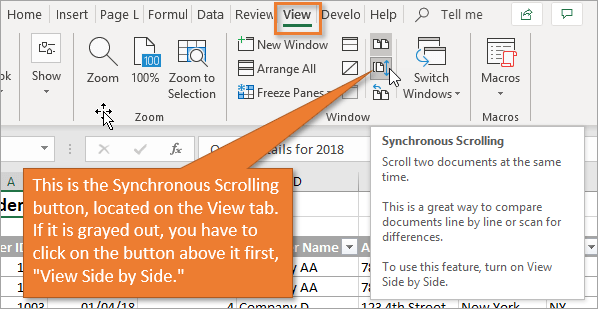
The Synchronous Scrolling Button may be grayed out. If so, you need to turn on View Side by Side. You can do this by clicking the button directly above Synchronous Scrolling. Keyboard shortcut: Alt+W+B
When you click on View Side by Side, it tends to reset any split screen setup you already had, so you may need to drag your window to the right again to see them side by side.
Once your windows are side by side and you've clicked the Synchronous Scrolling button, you will see how both sheets scroll simultaneously. This is the case whether you are using the up and down arrows on your keyboard, the scroll bar in either of the windows, or the roller wheel on your mouse.
See the video above for more details on this issue.
And just so you know, you can also use Synchronous Scrolling with two different workbooks as well.
Closing the New Window
Once you are finished, you can simply close either of the windows by pressing the red X in the top right of the application window. This will just close the additional window, and NOT close the file. The “-2” will disappear after the file name and you will be left with only one window open for the file.
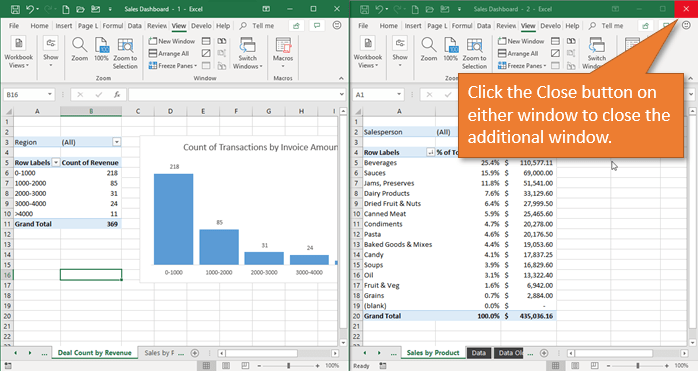
You will NOT be prompted to save the file when you close the additional window. You will only be prompted to save when you close the last remaining window for the file.
Close the “-2” Window First!
Even though you can close either window, it's best to close the “-2” window first. The new window does not retain the settings for gridlines or freeze panes. This is an unfortunate limitation of Excel.
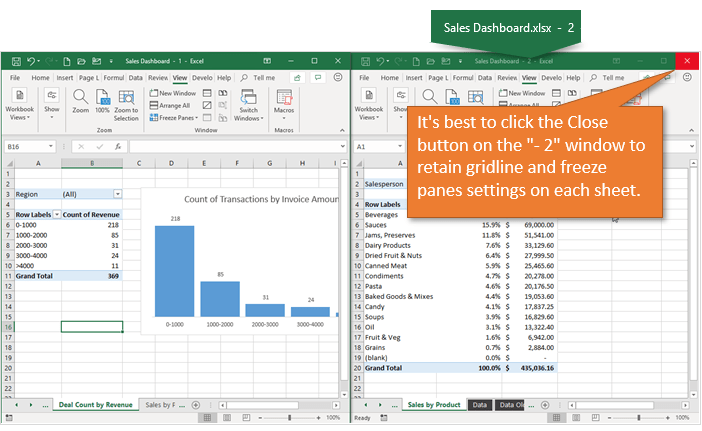
If you close the “-1” window and then make changes to the workbook, you will lose the gridline and freeze pane settings that are applied to each sheet.
I posted a macro in the comment below that apples the gridline settings for each sheet to the new window. I'll do a dedicated post on this in the future.
And a big thanks to Andre for pointing out the issue with closing window “-2” first.
Excel 2010 and Earlier
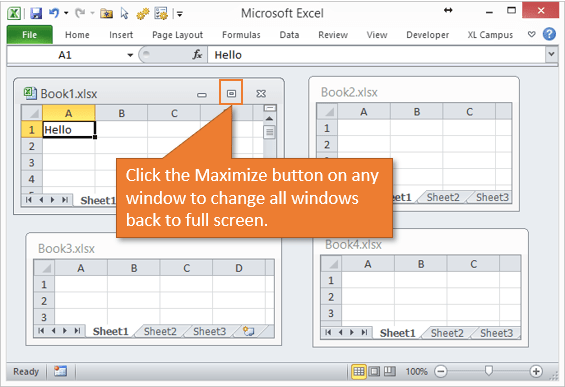
If you're using Excel 2010 or earlier for Windows then the process for viewing multiple windows is slightly different.
These versions of Excel used the Multiple Document Interface (MDI). This means all Excel files/windows are opened in the same application window. Excel is able to display multiple documents.
You can view multiple windows within Excel by clicking the Restore button for the current window.

The Arrange All and View Side by Side buttons can still be used as well. That will be the same as the instructions above.
When you want to view a single window again you can click the Maximize button in any window.
Excel 2013 and beyond moved to a Single Document Interface (SDI), which is what I explained in the article above.
Conclusion
I hope this post has been helpful to you for learning how to create a new window and view two (or more) worksheets from the same workbook.
The full keyboard shortcut to setup the new window in split screen is:
Alt+W+N ,Alt+W+B
This view can save us a lot of time when comparing data and tying out numbers between sheets.
Please leave a comment below with any questions or suggestions. Thank you! 🙂


Is there a way to remove duplicates on a long spreadsheet?
Hi Judi,
Yes, absolutely! Here is a post and video on 3 Ways to Remove Duplicates. I hope that helps.
I use the New Window feature regularly. I have 3 monitors so at times I have 6 “new windows” going . One question. How do I prevent Excel from turning on Grid lines in the new windows? (I turn off grid lines to make it cleaner looking for my users.) It’s really annoying and if I forget and leave one of the new windows as the last one before save/close – the grid lines are on and I have to go through and turn them all off again.
Thanks
Hi Tom,
Wow that is a lot of Excel! Awesome!!
Great question here. The grid lines are actually a window level setting. The window settings get reset to their defaults when a new window is created. I’m not exactly sure why it’s a window level property instead of a worksheet property. I’ll do some research and see if anyone at MS knows.
One workaround is to use a macro to apply the original grid line settings to each sheet in the new window. Here is a macro I just wrote to do that. It also creates the new window. So you could potentially use this instead of the New Window button. You could add it to your Personal Macro Workbook and create a keyboard shortcut or put a button in the ribbon.
Note: I have not tested this code thoroughly yet. It could probably also be made more efficient by storing the gridline property values in an array, then looping through the other windows. Especially if you have more than one extra window. Give it a try and let me know how it works for you. And definitely save your file before running it. I think it could be pretty labor intensive if your workbook has a lot of worksheets.
I’ll add this to the list for a future post as well. Thanks again Tom! 🙂
Here is an update to the macro that applies the Freeze Panes settings as well.
Great job! Thank you for this post and macro! I suggest copying also ActiveWindow.Zoom setting. Also note that newer Excel versions add “:1” and “:2″ instead of ” – 1″ and ” – 2″ to workbook names.
As always, very well explained, TY
Thanks Mark! 🙂
I wish I would have come across this a long time ago because this is going to be very helpful in my job. Thank you for sharing this information.
Awesome! Thank you for letting me know Sue. I’m happy to hear you will be putting this to good use. 🙂
Great trick, Jon!
Thanks Ben! 🙂
This is great! I have multiple project plan workbooks with a summary page that updates based on inputs to other sheets and setting up the workbook requires a lot of back an forth to check changes! Now I can do it on multiple monitors and lee live changes!!!!!
Nice! Yes, this technique works great for seeing live updates like that. Thanks Matt! 🙂
Awesome video. This will be incredibly useful to me. I shared it with my several people in my organization. Had no idea this feature existed.
Thanks so much Brett! I appreciate you sharing the post, and happy to hear it’s useful for you.
Not many things are so simple yet so great! Thanks for sharing and expanding my Excel tool box!
I love it! Thank you PGainey! 🙂
Jon,
The split screen is very useful to me and will start using today. No more clicking tabs back and forth!
Awesome! Yes it can be a real time saver. Thanks again Eddie! 🙂
Love Excel. The emails posts are great.
Awesome! Thanks for the vote Traci!
Do you like the entire post in the email better? yes, if you are on your phone when reading it is very beneficial.
Thank you for the feedback Marlena!
Excellent information.
Thanks Hamza!
That was really useful – will help us all
Thank you Gynandra! I’m happy to hear it.
As perfect as always.
Thanks Lennart! I appreciate your support.
Awesome tool! Will help immensely. Thank you.
Hi Jon,
thank you for that helpful post. 🙂
Maybe it is worth to mention that when you save a file with multiple windows open and close it, ist will open with the same set of multiple windows again.
Michael
Very much useful video.
Thanks JON
Hi Jon,
I am using Excel 2010 (Office Professional Plus 2010).
I see the “New Window” button under the “View” menu.
Clicking the button creates a second Excel-file (I see the -1 and -2), but both remain in the same “window”.
On the Taskbar, when hoovering over the Excel logo, I see that here are 2 files open (-1 and -2), but I cannot see both windows at the same time.
Am I doing something wrong?
Walter
Hi Walter,
Great question! Sorry, I should have mentioned this in the original post.
Excel 2010 and earlier use a Multi Document Interface (MDI), which means the windows will all open up in the same Excel application window. I added a 2010 section in the post above that explains how to use the Restore button to view multiple windows.
Excel 2013 and beyond moved to a Single Document (SDI), which means each window/file is in a separate window.
I hope that helps.
Hi Jon,
Thank you for the update. Crystal clear now !
Awesome video- thanks so much. Easy to follow!!
My new Window naming convention is different. Your example shows and talks about “-2”, but mine shows as “:2”. I’m on Excel 2013, so why the difference?
Just wanted to drop a comment to say thanks for the help.
Thank you for this, but there is one issue, like when i have this view side by side, i want to check a different sheet and make changes in the original sheet, but the moment i make changes in the original sheet the 2nd sheet also goes back to the main tab/sheet where the changes are being made. how to keep the 2nd sheet constant while i only view information in that and make changes in the original sheet. Thanks.
Hello Jon,
Thanks for your helpful tutorial
I have recently had a new work computer and I miss the MDI functionality that the old excel version had. I liked that I could view multiple worksheets in one window. I could see all the data in each work sheet and control them with a single tool bar. Now a lot of the space is used up by tool bars, etc. Is there a way to replicate this aspect of MDI in the new version of excel?
All the best
Roddy
Why I can’t view my excel top and bottom horizontally instead of the vertical side by side.
The button that says “Arrange All”, found right underneath the “New Window” button, allows you to arrange all windows tiled, horizontally, vertically, or cascaded.
I’m having an issue with syncing that I can’t find an answer to on Google: I have 2 windows open, both showing the same sheet. When I make changes to one, the other doesn’t sync/update, and keeps the old information. I’ve saved and closed the windows and application, but the issue persists.
Can you offer any insight to why this is happening?
Thanks
What if I do not have a Red X in the upper right?
How do I fix it if the -1 file was closed before -2. I have tried re-saving the -2 but it always opens with -2 at the end but as far as I know the -1 file no longer exists.
THIS IS VERY FINE.
I found the same kind of software and share to you.
http://www.colorfulmatrix.com/overview/shutter
shutter split screen software helps you split the screen and improve your operation quickly. It’s a windows application software that lets you fast and view multiple windows side-by-side.
I hope this is helpful, enjoy it.