Bottom line: Learn some of my favorite keyboard shortcuts when working with rows and columns in Excel.
Skill level: Easy

Whether you are creating a simple list of names or building a complex financial model, you probably make a lot of changes to the rows and columns in the spreadsheet. Tasks like adding/deleting rows, adjusting column widths, and creating outline groups are very common when working with the grid.
This post contains some of my favorite shortcuts that will save you time every day.
I've also listed the equivalent shortcuts for the Mac version of Excel where available.
#1 – Select Entire Row or Column
Shift+Space is the keyboard shortcut to select an entire row.
Ctrl+Space is the keyboard shortcut to select an entire column.
Mac Shortcuts: Same as above
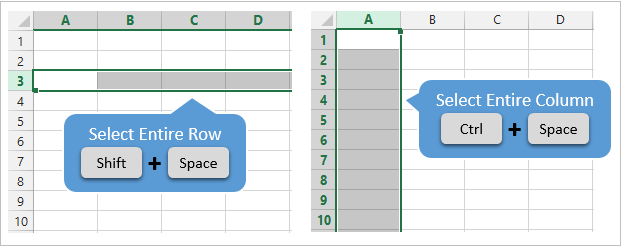
The keyboard shortcuts by themselves don't do much. However, they are the starting point for performing a lot of other actions where you first need to select the entire row or column. This includes tasks like deleting rows, grouping columns, etc.
These shortcuts also work for selecting the entire row or column inside an Excel Table.
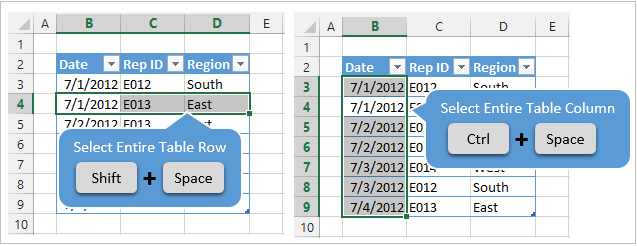
When you press the Shift+Space shortcut the first time it will select the entire row within the Table. Press Shift+Space a second time and it will select the entire row in the worksheet.
The same works for columns. Ctrl+Space will select the column of data in the Table. Pressing the keyboard shortcut a second time will include the column header of the Table in the selection. Pressing Ctrl+Space a third time will select the entire column in the worksheet.
You can select multiple rows or columns by holding Shift and pressing the Arrow Keys multiple times.
![]()
#2 – Insert or Delete Rows or Columns
There are a few ways to quickly delete rows and columns in Excel.
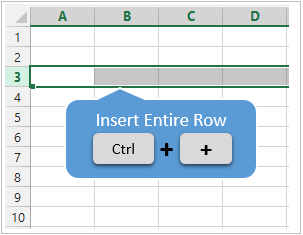
If you have the rows or columns selected, then the following keyboard shortcuts will quickly add or delete all selected rows or columns.
Ctrl++ (plus character) is the keyboard shortcut to insert rows or columns. If you are using a laptop keyboard you can press Ctrl+Shift+= (equal sign).
Mac Shortcut: Cmd++ or Cmd+Shift+
Ctrl+- (minus character) is the keyboard shortcut to delete rows or columns.
Mac Shortcut: Cmd+-

So for the above shortcuts to work you will first need to select the entire row or column, which can be done with the Shift+Space or Ctrl+Space shortcuts explained in #1.
If you do not have the entire row or column selected then you will be presented with the Insert or Delete Menus after pressing Ctrl++ or Ctrl+-.
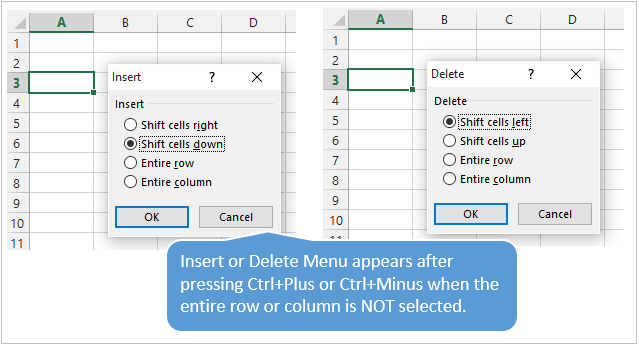
You can then press the up or down arrow keys to make your selection from the menu and hit Enter. For me it is easier to first select the entire row or column, then press Ctrl++ or Ctrl+-.
So, the entire keyboard shortcut to delete a column would be Ctrl+Space, Ctrl+-. You could also use the keyboard shortcut Alt+H+D+C to delete columns and Alt+H+D+R to delete rows. There are lots of ways to do a simple task… 🙂
#3 – AutoFit Column Width
There are also a lot of different ways to AutoFit column widths. AutoFit means that the width of the column will be adjusted to fit the contents of the cell.
You can use the mouse and double-click when you hover the cursor between columns when you see the resize column cursor.
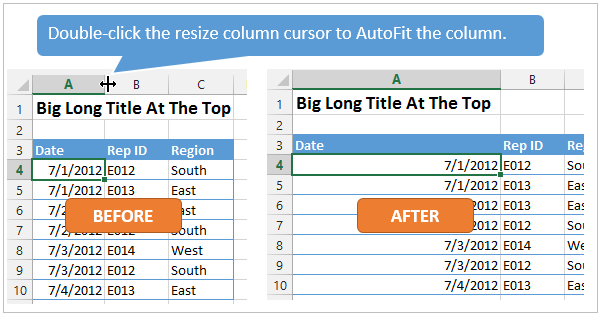
The problem with this is that you might just want to resize the column for the date in cell A4, instead of the big long title in cell A1. To accomplish this you can use the AutoFit Column Width button. It is located on the Home tab of the Ribbon in the Format menu.
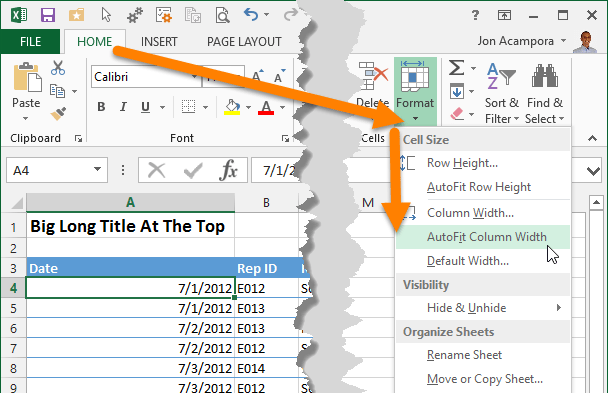
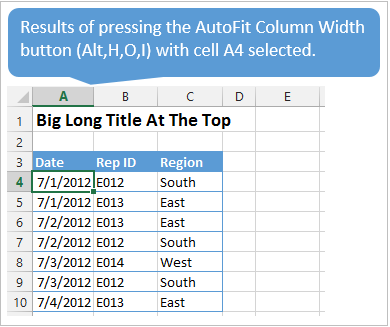
The AutoFit Column Width button bases the width of the column on the cells you have selected. In the image above I have cell A4 selected. So the column width will be adjusted to fit the contents of A4, as shown in the results below.
Alt,H,O,I is the keyboard shortcut for the AutoFit Column Width button. This is one I use a lot to get my reports looking shiny. 🙂
Alt,H,O,A is the keyboard shortcut to AutoFit Row Height. It doesn't work exactly the same as column width, and will only adjust the row height to the tallest cell in the entire row.
Mac Shortcuts: None that I know of. The Mac version does not use the Alt key sequence which I believe is a limitation of the Mac OS.
#3.5 – Manually Adjust Row or Column Width
The column width or row height windows can be opened with keyboard shortcuts as well.
Alt,O,R,E is the keyboard shortcut to open the Row Height window.
Alt,O,C,W is the keyboard shortcut to open the Column Width window.
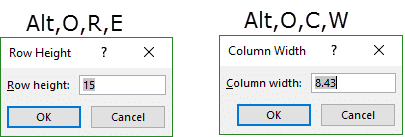
The row height or column width will be applied to the rows or columns of all the cells that are currently selected.
These are old shortcuts from Excel 2003, but they still work in the modern versions of Excel.
Mac Shortcuts: None that I know of. The Mac version does not use the Alt key sequence which I believe is a limitation of the Mac OS.
#4 – Hide or Unhide Rows or Columns
There are several dedicated keyboard shortcuts to hide and unhide rows and columns.
- Ctrl+9 to Hide Rows
- Ctrl+0 (zero) to Hide Columns
- Ctrl+Shift+( to Unhide Rows
- Ctrl+Shift+) to Unhide Columns – If this doesn't work for you try Alt,O,C,U (old Excel 2003 shortcut that still works). You can also modify a Windows setting to prevent the conflict with this shortcut. See the comment from Pablo Baez on Oct 5, 2015 below for further instructions. Thanks Pablo! 🙂
Mac Shortcuts: Same as above
The buttons are also located on the Format menu on the Home tab of the Ribbon. You can hover over any of the items in the menu and the keyboard shortcut will display in the screentip (see screenshot below).
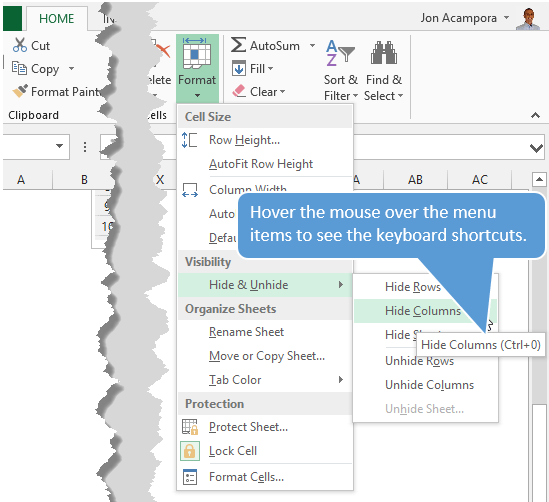
The trick with getting these shortcuts to work is to have the proper cells selected first.
To hide rows or columns you just need to select cells in the rows or columns you want to hide, then press the Ctrl+9 or Ctrl+Shift+( shortcut.
To unhide rows or columns you first need to select the cells that surround the rows or columns you want to unhide. In the screenshot below I want to unhide rows 3 & 4. I first select cell B2:B5, cells that surround or cover the hidden rows, then press Ctrl+Shift+( to unhide the rows.
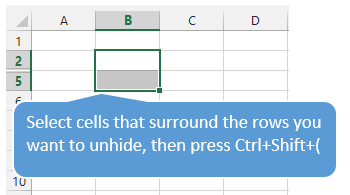
The same technique works to unhide columns.
#5 – Group or Ungroup Rows or Columns
Row and Column groupings are a great way to quickly hide and unhide columns and rows.
Shift+Alt+Right Arrow is the shortcut to group rows or columns.
Mac Shortcut: Cmd+Shift+K
Shift+Alt+Left Arrow is the shortcut to ungroup.
Mac Shortcut: Cmd+Shift+J
Again, the trick here is to select the entire rows or columns you want to group/ungroup first. Otherwise you will be presented with the Group or Ungroup menu.
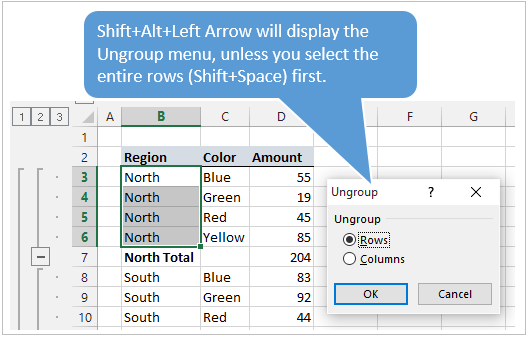
Alt,A,U,C is the keyboard shortcut to remove all the row and columns groups on the sheet. This is the same as pressing the Clear Outline button on the Ungroup menu of the Data tab on the Ribbon.
*Bonus funny: At some point when using the group/ungroup shortcuts, you will accidentally press Ctrl+Alt+Right Arrow. This is a Windows shortcut that orientates the entire screen to the right. I call it “neck ache view”. To get it back to normal press Ctrl+Alt+Up Arrow.
If your co-worker or boss accidentally leaves their computer unlocked and you want to play a joke on them, press Ctrl+Alt+Down Arrow. This will turn their screen upside down. Don't forget to record a video of their WTF reaction… 🙂
What Are Your Favorites?
There are a ton of keyboard shortcuts for working with rows and columns. The above are some of my favorites that I use everyday. What are some of your favorites? Please leave a comment below. Thanks! 🙂


This was awesome, thank you very much for posting! I feel like shortcuts can often be ignored and this was very helpful.
Thanks Zee! I agree. I’m a big fan of shortcuts because they can save a lot of time with repetitive tasks.
Inside an Excel Table you can use Ctrl++ (plus character) to insert rows and Ctrl+- (minus character) to delete rows, without mark the row or column first.
Thanks for the tip Anna! One small caveat to that is if the selected cell is blank and the column of the selected cell contains blanks, then Ctrl+- will delete the Table column instead of the row. I’m not sure of the exact rule on how this works, but it can happen. Either way, your tip is awesome. Thanks again for sharing! 🙂
Upside down screen:
Someone taught me this trick a while back and when I turned it back upright all of the desktop icons were rearranged. Be careful whose computer you play tricks on. :-\
Oops! Thanks for the heads up Teri! Make sure there desktop is tidy first… 😉 j/k
I work with Excel, though I would not call myself an Excel Ace by any stretch. However thank you very much for the tips that will save me time as I work in Excel. Sometimes the simple tips for the everyday are the best
Awesome thanks Evan! I love saving time. 🙂
Alt H O I was a helpful tip. It’s one of those formatting shortcuts I should have known all along, but instead chose to go around and click on column headers one by one…
Shift Alt Left Arrow was also super helpful – I get a lot of reports from our system with the stupid groupings that i always have to go in and clear out.
Thanks Nate! Glad to hear you will be saving a few clicks. 🙂
CTRL +D is my favorite. Copies whatever is in the cell above.
Thanks Patricia! That’s another great shortcut that I don’t use as often as I should. Ctrl+R copies from the cell to the left, which can be another handy one.
DO we have any shortcut to copy from left cell as well ?
Hi Kool,
Ctrl+R will copy from the left as I mention above. I don’t believe there is a shortcut to copy from the right, if that is what you are looking for.
Thank you very much Sir Jon..,!!!
Thanks Jane! 🙂
Hi John,
Excellent tips. I love shortcuts.
If the shortcut Ctrl+Shift+) to Unhide Columns doesn’t work, it’s a Windows set up issue. Follow these instructions to fix it:
• Click Start, and then click Control Panel.
• Double-click Regional and Language Options.
• Click Keyboards and Languages tab, and then click Change keyboards…
• Click Advanced Key Settings tab, and select Between input languages.
• Click Change Key Sequence…
• For Switch Keyboard Layout, select Not Assigned.
• Click OK to close each dialog box.
Thanks,
Pablo
Wow very cool!!! Thanks for sharing Pablo! 🙂
Really help full, you are start Pablo.
Thanks Jon Acampora, you are rockstar. 😉
Thanks Kool! 🙂
You’re a lifesaver, Pablo! This has been killing me for who knows how long.
Wow, This is amazing. It works. Thanks Pablo Baez. U r simply amazing.
Thanks for sharing such valuable and beautiful information … Pablo Bhai Jan
Hi John & Pablo,
Nice tips, I too love shortcuts, Thanks.
Below are the steps for higher versions of Windows for the same with little changes
1. Click Start, and then click Control Panel.
2. Double-click Language.
3. Click Advanced Settings
4. Click Change language bar hot keys under Switching input methods
5. Click Advanced Key Settings tab, and select Between input languages.
6. Click Change Key Sequence…
7. For Switch Keyboard Layout, select Not Assigned.
8. Click OK to close each dialog box.
Thanks
Velks
Thanks Velks. This worked for me on Friday when I did it. I came in today on Monday, and it’s no longer working for me. Is this only a temporary fix? Has anyone else had this problem?
James
Same to me. It just work for a while and then not anymore. Does anyone know about this?
thanks a ton
There’s no keyboard and language input tab in control pannel in windows 10
In my version of Win 10, I now have to find this by going through these steps:
Open Settings (Win Key + i)
Select ‘Devices’
Go to the ‘Typing’ tab on the left
Select ‘Advanced keyboard settings’
Select ‘Language bar options’
Now you will have the dialog where you can go to the ‘Advanced Key Settings’ tab and click the ‘Change Key Sequence…’ button. My ‘Switch Keyboard Layout’ option was already set to ‘Not Assigned’, and I found that I also had to change the ‘Switch Input Language’ option to ‘Not Assigned’.
Thanks Pablo, the balance of parentheses has finally been restored!
This is a nice little shortcut! And for navigation in Windows 10 it looks a little different to get there:
Click Start, and go to Control Panel.
• Search “Advanced Keyboard Settings”
• Click Language bar options
• Click Advanced Key Settings tab, and select Between input languages.
• Click Change Key Sequence…
• For Switch Keyboard Layout, select Not Assigned.
• Click OK to close the dialog boxes.
Thanks Pablo
Thank you So much sir
This information
You r Awesome Buddy ;>
Hi Pablo,
There is an even better solution for those who like to switch languages by pressing Shift+Ctrl (in contrast to orthodox Shift+Alt). One can’t safely select “Not Assigned” for this combination in your instruction because it would prevent them from switching languages.
In Windows 11 (might be the same in Windows 10), go to:
Settings > Time & language > Typing > Advanced keyboard settings.
Under “Switching input methods” tick the mark “Let me use a different input method” for each app window.”
Question about #3 – AutoFit Column Width – can this be used with a pivot table? The first 2 rows typically expand because the top left most cell will explain that data in the table (i.e. “Sum of Boxes”) and the cell next to it will say “Column Labels”. When my labels are narrower than these it auto fits to this width – I would LOVE for it to auto fit to the data actually in the Row and column labels area. Thanks for your help!
Hi Jenni,
Great question. Yes, the AutoFit Column Width feature can be used with Pivot Tables. Select the cells in the values area, then do the autofit (Alt+H,O,I).
The problem that you might be experiencing is that each time you refresh the pivot table, the columns autofit back to the width of the header. This is an option in the pivot table that can be turned off.
Right-click the pivot table and choose PivotTable Options… Then uncheck the checkbox on that says “Autofit column widths on update”. Here is a screenshot.
I hope that helps. Please let me know if you have any questions. Thanks!
Thanks so much! That really cuts out some aggravation!
Wow amazing!! Thanks
Is there a shortcut for clicking on the + – to open or close the group?
Hi Peter,
Great question! Yes, if you have a cell selected inside the row or column you want to expand/collapse then the following shortcuts will work.
Show Details (Expand Group): Alt,A,J
Hide Details (Collapse Group): Alt,A,H
These are the shortcut keys to the Show/Hide Details buttons on the Data tab of the ribbon.
If you want to expand/collapse all groups on the worksheet then hit Ctrl+A first to select all cells. You might have to hit Ctrl+A multiple times depending on if your current selection is in a data range or Table.
Let me know if you have any questions. Thanks!
Thank you John 🙂
Is there a shortcut so that when you insert cells it always moves “Shifts cells down” instead of the four options, and also for when deleting cells it always “Shifts cells up”
Hi Geoff,
I don’t believe there is a direct shortcut, but the Insert/Delete Cells menu should default to those options. That means you can just press Enter when the menu appears. So, Ctrl+”+”, Enter would be the shortcut to shift cells down.
If you want to shift the entire row down, or insert a new row, then you have to select the entire column first with Shift+Space bar. So, Shift+Space bar, Ctrl+”+” is the keyboard shortcut to insert a row.
I realized that I need to update my screenshots above to reflect that. I don’t think I made it clear enough. Please let me know if you have any other questions. Thanks Geoff!
Hi Jon,
could you please let me know the shortcut key to expand Pivot one cell in new sheet.
Hi Arpana,
Are you referring to showing the details of the pivot cell? Creating a new sheet that shows the source data for that cell? This is usually accomplished by double-clicking the cell or right-clicking > Show Details.
If your keyboard has a menu key, then Menu Key + E is the keyboard shortcut to show the details of a cell in the values area of a pivot table. Here is an article on keyboard shortcuts for the menu key.
Hi Jon,
Yeah right! what you are saying but there is one more shortcut key which i want to know.
VERY HELPFUL AND EASY SHORT CUT KEYS
FOR WORKING IN EXCEL…………
THANKS ……….
Thanks Aman!
Nice and very helpful…really, Please post more so that learning dont stop…
Thanks Nikhil! Will do! 🙂
Using rows
My working by formula need numbers of rows problems to add data of dhamma . The following numbers are should have at a spreadsheet. This amounts have in the 23 kinds of dhamma . All these are need to write the 4 types.
So rows numbers of workbook must have (23) numbers. Can you do this.
pathana dhammanulome pacchavara hetumulakadi sabammulakam
Numbers of questions.
(1) 49
(2) 1127
(3) 24794
(4) 520674
(5) 10413480
(6) 197856120
(7) 3561410160
(8) 60543972720
(9) 968703563520
(10) 14530553452800
(11) 203427748339200
(12) 2644560728409600
(13) 31734728740915200
(14) 349082016150067200
(15) 3490820161500672000
(16) 31417381453506048000
(17) 251339051628048384000
(18) 1759373361396338688000
(19) 10556240168378032128000
(20) 52781200841890160640000
(21) 211124803367560642560000
(22) 633374410102681927680000
(23) 1266748820205363855360000
Hi Ashinpannasiri,
Sorry I’m not sure I understand your question. You might be able to use data validation for this.
Hi Jon,
could you please let me know the shortcut key to worksheet tab hide and unhide
Hi Manibalan,
Great question!
The keyboard shortcut to hide sheets is: Alt,O,H,H
The keyboard shortcut to unhide sheets is: Alt,O,H,U
Those are old Excel 2003 shortcuts, but they still work in the modern versions of Excel. Plus, they are faster than the new ribbon shortcuts to hide/unhide sheets. Alt,H,O,U,S to Hide a sheet. Alt,H,O,U,H to Unhide a sheet.
Its Very useful to learn
Very nice
Hi,
If you want to go to a desired column or row like to column p or to 25th row, what keyboard shtct can you use?
Hi Treg,
You can use Ctrl+G to open the Go To menu, then type the cell address. To go to a column you would need to type a:a to select the entire column. To go to a row you would need to type 25:25. It’s not the most efficient way, but does get you there. I hope that helps.
Thanks!
Hi Jon,
Do we have a shortcut key for the menu we get when we right click on sheet tabs.?
Hi Saba,
Yes, the Menu key will bring up the right-click menu. Checkout my article on Keyboard Shortcuts for the Menu Key for more details.
Nice article!
For the manual adjusting of row heights and column widths, I prefer using the Menu key. It’s a quick and easy combination of Menu Key + R for row heights and Menu Key + C for column widths.
Awesome tip! Thanks John! 🙂
so informative mr acampora… keep posting and helping us…
Thanks Nazeer! Will do. 🙂
Jon,is there a shortcut to control the volume of the PC speaker? Thx
A lot of keyboards have dedicated buttons for this.
Thanks Jon, awesome !
Perfect I found it !
Awesome! Time to rock out! 🙂
very useful information. thanks for given valuable information.
Thanks Naga! 🙂
Very useful info. Thanks a lot!
Thanks Kuldeep! 🙂
very useful information.i am using this function and fill very better
Thank you for sharing, really helpful Sir
Thanks Yudis! 🙂
Hi Jon!
Can you tell me how to lock in the first three columns of a spreadsheet so that they don’t hide when you hide the cells to the right of them? In other words, how to make the first three columns lock in and not disappear when you hide the rows in the right of them?
Dear Jillian
You can select Cell D1 then use Freeze panes (in View Tab). Keyboard shortcut for it is Alt+W+F. Also for Unfreeze pane.
Thanks
Hi, I was wondering if there is a keyboard shortcut for ‘Autofill’. I often copy formulas down the column and do the click and drag or double click on the bottom RHS of the cell, but was wondering if there was a shortcut. Thanks.
Hi Alex,
Great question! I don’t believe there is a direct keyboard shortcut that mimics the double left-click on the fill handle. That would be a nice feature though.
Select the cells and Ctrl+D. Similarly, Ctrl+R for row wise autofill
Is there a shortcut for showing/hiding Grouped columns?
Hi Pete,
Yes, the Show Detail and Hide Detail buttons on the Data tab can be used for this. The keyboard shortcut to hide the groups (hide detail) is Alt, A, H. The keyboard shortcut to show or expand the groups (show detail) is Alt, A, J.
You must have a cell selected inside the row or column group for this to work. If the cell intersects both the row and column groupings and you only want to hide the column groups, then select the entire column first with Ctrl+Space. Or do the opposite if you only want to collapse the row groupings.
I hope that helps. Thanks!
How to jump from one row to another with short cut key?
I don’t believe there is a dedicated keyboard shortcut for that. You could press down arrow, then shift+space bar.
You, my friend, are FREAKIN’ AWESOME!
I love and appreciate the level of attention to detail in your work.
Keep it up!
Thank you so much Ibrauheem! I really appreciate your support. 🙂
HI
HOW TO HIDE ROW AND COLUMN WITH KEYBOARD???
Hi Shakir,
It’s #4 in the article above.
To adjust all columns width at once, select all the data in the worksheet using Ctrl + A and then type Alt + O + C + A to adjust all column widths.
Great tip Swati! Thank you! 🙂
how to only Zero hide formula
Hello sir,
How to hide Row/column?
Shortcut key.
Dear sir,
pls tell me. how to hide row/column? shortcut key……..and how to insert sheet in excel file shortcut key…..
I explain how to hide rows and columns in #4 above. The keyboard shortcut to add a new sheet is Shift+F11. I hope that helps. Thanks!
This is one of the most well thought out guides I have seen with regard to Excel shortcuts. I consider myself an amatuer in Excel and I am pretty well versed with formulas and macros too. I recently started working and use excel on a daily basis, so I have been trying to minimise my mouse usage and this guide was the perfect way to start. A few other shortcuts i use are Ctrl+D and Alt+H+F+I+S for auto fill and series fill.
Thank you UK! I really appreciate the nice feedback. 🙂
Hi, Can you please let me know what is shortcut key for making same format between cells
Hi Karma,
I don’t believe there is a dedicated shortcut for this, but you can copy/paste formats (Ctrl+C, Alt,E,S,T). Or you can use the Format Painter (Alt,H,F,P).
Is there a way to expand the first column (to the left of Column A)?
Thanks!
Hi Jon,
Really good guide, thanks. Do you know if there is a way to hide the coordinates that appear when you select rows and columns? They get in the way of column A if you are selecting multiple rows down. Similar thing with heights and widths appearing when you try to change manually.
Thanks
FYI I have submitted this question to one of the forums. No takers after 3 days.
Excel 2013 – Win10
Shortcut key Ctrl+Shift+# formats dates as d-mmm-yy
I want to change that combination to format as d/m/yyyy.
Can it be done?
Google is silent, MS is silent …
Hi Dave,
I don’t believe there is any way to change those shortcut keys. You could write a macro and assign it to that shortcut key to apply the formatting. The disadvantage there is that you will not be able to undo the action. My Formatting Shortcuts Add-in also helps with this process, and allows you to retain the full undo history. I hope that helps.
hllo my neames AhmedIbrahim work in company dxn international this my id Number819008228you can rigseteraion in this companyand after that you can see the websit
I’m not able to un hide the columns with using of this short cut ctrl+shift+0
Hi Jaya,
There is a Windows setting that causes conflict with the keyboard shortcut to unhide columns. The comment from Pablo Baez on Oct 5, 2015 explains how to change the setting.
sir,
can u please tell me
how to insert tables
Hi Venkat,
Ctrl+T is the keyboard shortcut. Check out my video on a Beginner’s Guide to Excel Tables to learn more.
HI DEAR JON, CAN YOU GUIDE ME WHAT IS SHORTCUT OF HIDE COLUM AND CELL.
CTRL+9
Can You tell me sir. what is the shortcut of row height.
Shortcut key for executing format painter.
First select the Cell, which format you want to copy, then press
Alt+H+F+P
Is there a shortcut to perform the same action to a cell that I just did to a previous cell?
Like, to select another cell repeat a command without clicking, choosing dropdown or menu, etc.
Much smaller scale than a macro. I think Mac has a function key for it, but I’m looking for one for Windows 8.1.
Thanks!
F4 repeats the last action.
Doesn’t work for all commands
Thankew so much for this short cut keys. Appreciate you 🙂
I loved reading all the helpful hints. They were just great. I am still trying to find an easy way to hide thousands of rows all at once without holding down the Ctrl – scrolling to the bottom of the list and then selecting hide. I need to export 10000’s of rows of data multiple times and am very tired of scrolling through the long lists. I know about Ctrl+Arrow key to get to the bottom of the rows quickly but still can’t find a good way to select 1-3000 then only hide 2-2999. Any suggestions?
The quickest way to unhide rows is by selecting the range of rows you wish to unhide. Place your cursor between the row (literally between two row numbers), then double click. Voila!!!!
hi
what is the shortcut key to get form =countif(A2:A1000,H2) to =countif($A$2:$A$1000,$H$2) in excel
Thanks for these useful shortcuts!