Bottom line: Learn how to create a GIF image with a progress bar or timeline to make it easy to see when the animation starts and ends.
Skill level: Beginner

Why Do GIF Images Need Progress Bars?
GIF animated images have become extremely popular. Especially for quick screencast tutorials that might not require an entire video with audio. Viewers also love GIF animations because you can quickly learn something new, without having to watch a video and turn on the audio on your device.
The one thing I find lacking with GIFs is a progress bar at the bottom of the image. When you are scrolling on a webpage and come across a GIF animation, you typically don't know where you are at in the timeline of the animation. You have to watch it a few times to figure out when it starts and ends. This can sometimes end up taking more time than it would to watch a video, and kind of defeats the purpose.
So, I'm on a mission to help creators add progress bar timelines to the bottom of their GIF animated images. This progress bar is similar to that of a video, and is just a visual indicator of how much time has progressed in the GIF.
How to Create the Progress Bar in Camtasia
I use Camtasia to create all my screencast videos and GIF images. So I'm going to explain this technique using Camtasia. However, it can probably be created with any video editing software that has annotations and transitions.
Note: I use Camtasia 9 for this tutorial, but it also works in Camtasia 8.
Creating the progress bar is actually quite easy. It just requires an annotation and a transition, and can be done in less than 30 seconds.
Here is a quick animation that shows how to add the progress bar.

The following is a step-by-step guide on how to add the progress bar to your GIFs.
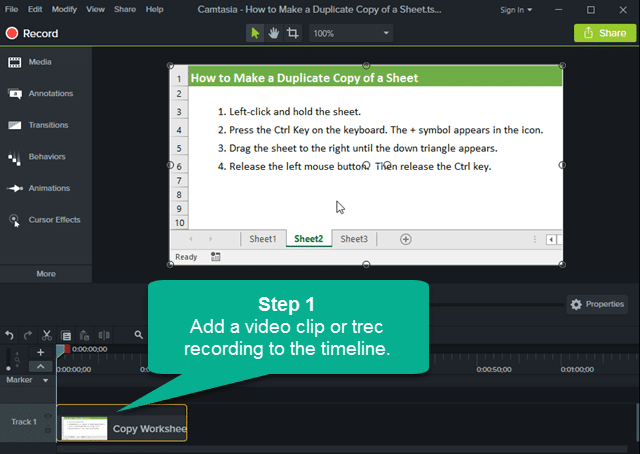
Step 1 – Record the Screencast
The first step is to record the screencast or create the animation in Camtasia. I'm not going to go over this in detail. We just need to have a video clip and add it to the timeline in Camtasia. For this example I will be using a recording of a recent Excel shortcut I shared to make a duplicate copy of a sheet.
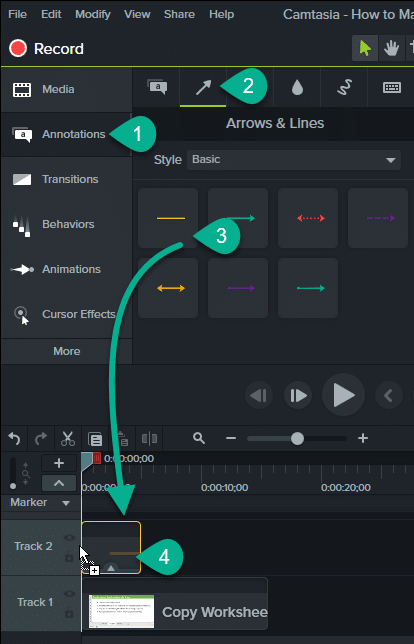
Step 2 – Add an Annotation to the Timeline
The next step is to add the progress bar or timeline shape. In Camtasia this is called an Annotation. Here are the steps to add the Annotation.
- Click on Annotations in the Tools menu on the left side (Tools > Annotations).
- Click the Arrows & Lines option.
- Select the basic flat line shape.
- Add the Annotation to the beginning of the timeline.

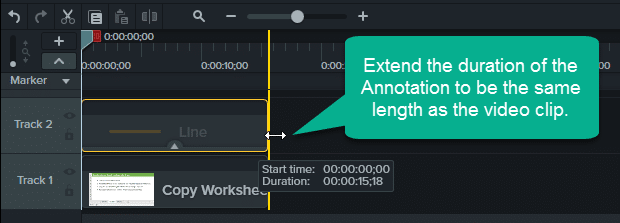
- Change the duration of the Annotation to be the same length as the video clip.

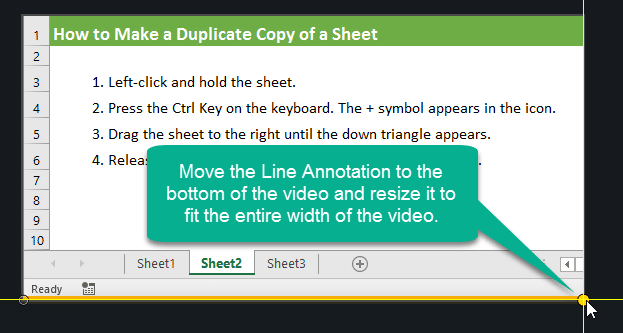
- Move and resize the Line Annotation on the Canvas so that it is at the bottom of the video, and extends the entire width of the video.

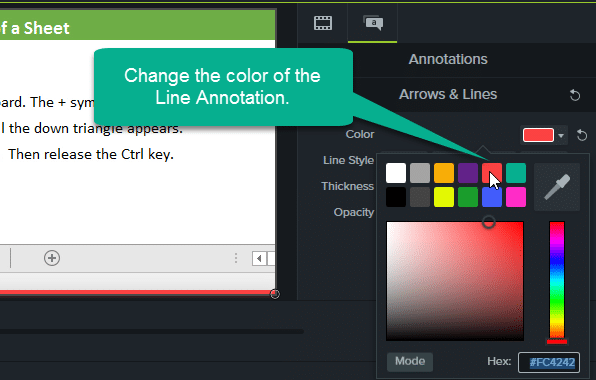
- Change the color of the Annotation to red, or a color that contrasts the background of your GIF.

Alright! That looks like a lot of steps, but should really only take a few seconds to setup. We should now have a line that looks like a full progress bar and extends across the bottom of the video. The next step is to animate it with a Transition so it progresses as the video plays.
Step 3 – Animate the Progress Bar with a Transition
Now we need to make the progress bar move as the video plays. The trick here is to use a Slide Right transition.
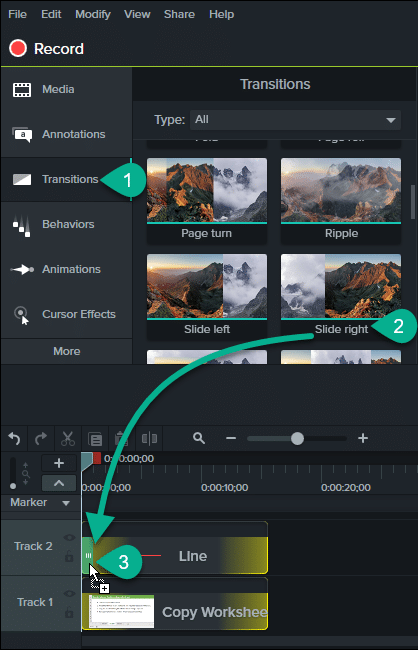
- Click on Transitions in the Tools menu.
- Select the Slide Right Transition.
- Add the transition to the start of the Line Annotation we added in step 2. You will want to make sure to drag the transition to the left side of the annotation, so it only added to the left side. If you drop the transition in the middle of the annotation it will be added to the beginning and the end, and we do NOT need the transition at the end.

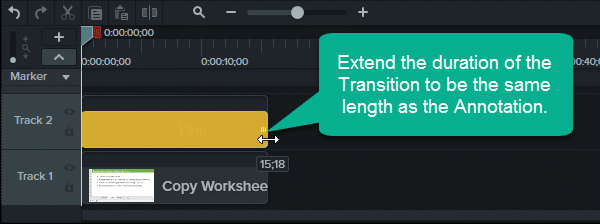
- Change the duration of the transition to be the entire length of the annotation, by dragging the right side of the transition to make it longer.

That's it! The Slide right transition will slowly make the line appear from left to right throughout the duration of the video. This creates our progress bar.
Play the video to test it out.
Step 4 – Create the GIF File
The final step is to create the GIF file. You can also add additional annotations to the GIF that include instructions or a guide for your screencast.
To create a GIF in Camtasia:
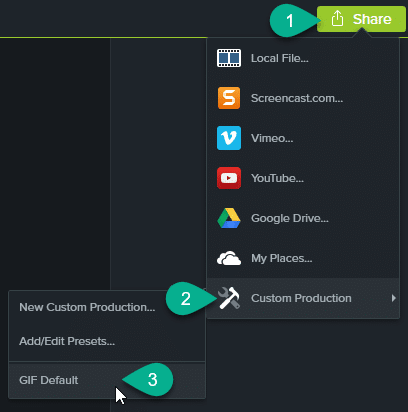
- In Camtasia 9 press the Share button, then choose Local File. In Camtasia 8 press the Produce and Share button.
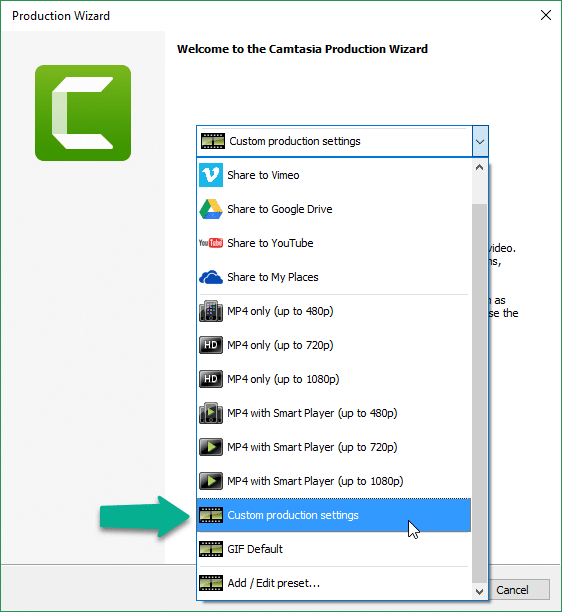
- The Product Wizard window will open. Select Custom Production Settings from the drop-down menu and click Next.

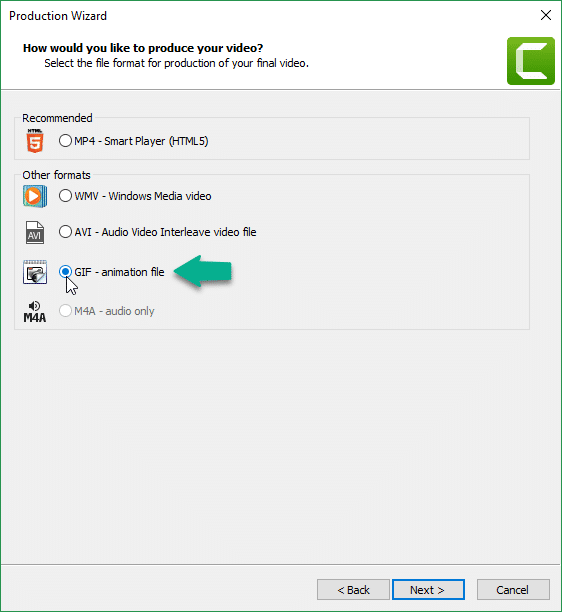
- Select the “GIF – animation file” radio button and press Next.
- You will then be presented with a series of 4 menus with different options and settings for the GIF. You can leave these as the default settings and just click Next at each window.
- Finally, you will give the file a name and choose a folder to save it in. Then click the Finish button.
The GIF animation will be processed and created. Open the GIF in a web browser to see the animation with the progress bar, and then share it with the world.
Bonus tip: We can skip all the settings menus for the GIF in the Production Wizard by saving the Custom Production Settings as a Preset after creating the GIF.

I named mine GIF Default. Now, I can create the GIF with just a few clicks.
Questions & Sharing Your GIF
Please leave a comment below with any questions. I'm also interested to see what your GIF looks like with the progress bar added. So please feel free to leave a comment with a link to the GIF or webpage where you have it displayed.
Thank you! 🙂


Hi,
Thanks for this great tutorial! I wish to take an existing gif, put it at the center of my video screen (with a black background) with a progress bar “loading” the content. Then I want the gif to move to a corner and shrink, with the progress bar disappearing and the video playing, gif intact (kind of like a Call of Duty between-missions video).
Do you have any more pointers for for getting this to work in Camtasia?
Hi Alex,
I’m sure this is possible. You might have to take a screen recording of the existing GIF, then import that video (trec) file into Camtasia. I’m not sure if you can load existing GIFs to the timeline. I hope that helps get you started.
Jon – this is awesome! I saw your effect on one of your tutorials, Googled for the step by step instructions and came across this tutorial! Should have known that you had one available 🙂 I’m going to use this trick on my Tableau dashboards blog newprediction.com
Thanks from a fellow CAOCer!!
Hey Brian,
Thanks so much for the nice feedback. Happy to hear you’ll be putting this to use. All GIFs need progress bars! 😉
That is excellent and isn’t it one of those, how didn’t I think of that, moments?
Nice and simple explanation.
Many thanks for sharing.