Bottom Line: Learn mouse and keyboard shortcuts to save time when working with Excel Tables. These shortcuts are for both Windows and Mac versions of Excel.
Skill Level: Beginner
Watch the Tutorial
Download the Excel File
If you'd like to use the example Excel workbook from the video, you can download it here:
Master Excel Tables With These 10 Shortcuts
If you work with Excel Tables often, you're going to want to memorize several of the following shortcuts to make your life easier. These shortcuts are for both mouse and keyboard and can be used on Windows or Mac.
1. Selecting Rows and Columns
To select a column in an Excel Table, hover over the top half of column's header cell, until your cursor becomes a down arrow. Then left-click and it will select all of the cells in that column. (If you left-click a second time, it will include the header cell in your selection.)
The keyboard shortcut for selecting a column in Excel tables is Ctrl + Space.

In the video above I mention a small nuance with Ctrl + Space. If you have the cell in the first row of the body of the table selected, Ctrl + Space will scroll down to the bottom of the table. You can press Ctrl + Backspace to scroll up and activate the first cell in the selection/column. If you have a cell in any subsequent row selected, Ctrl + Space will NOT scroll down. Another weird but possibly useful quirk of Excel tables…
To select a row, hover your cursor near the left border of the table until it becomes a right-pointing arrow; then left-click.
The keyboard shortcut is Shift + Space.

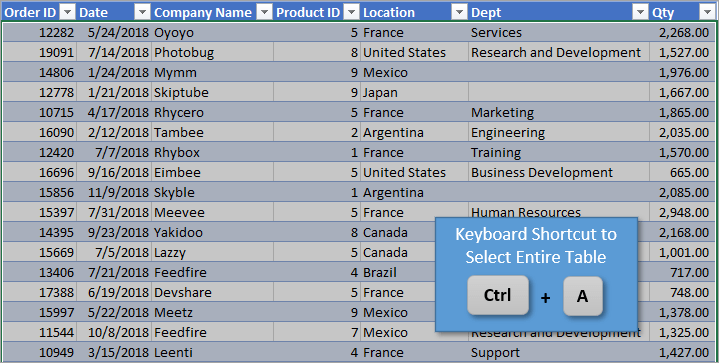
2. Selecting the Entire Table
To select the data for the entire table, you can press Ctrl + A. This highlights everything except the header and total rows. If you'd like to include those rows as well, simply press Ctrl + A a second time.
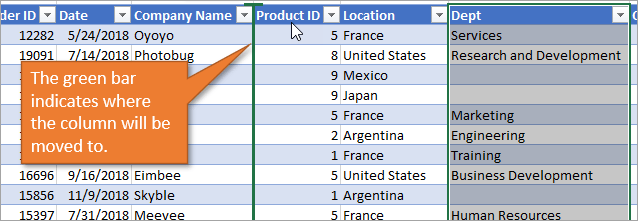
3. Moving Columns
To move a column, select the header cell in the column that you want to move. Then hover your cursor over the border of that cell until the cursor becomes a crosshairs.
Then drag it to where you want it to go, keeping the cursor in the header row. A vertical green bar will appear between columns as you drag the cursor to indicate where the column will end up when you release the mouse.
Moving rows is similar. Essentially, you follow the same process, but you drag your row (or rows) up or down instead of left/right.
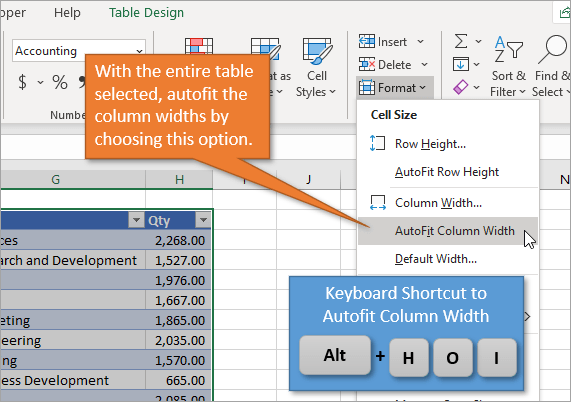
4. Autofitting Column Widths
To resize the widths of the columns so that the cells in the table display all of the contents, use this shortcut. First select all of the table contents (see Shortcut 2 above), including the header and total rows. Then select Autofit Column Width in the Format drop-down menu on the Home tab.
The keyboard shortcut for this is Alt + H O I.
Autofitting is a great technique to use after you have inserted, deleted, or moved columns in a table, since the column widths do not automatically resize.
I don't know of a Mac equivalent for this keyboard shortcut, so you'll have to use the Format menu option on the Home tab.
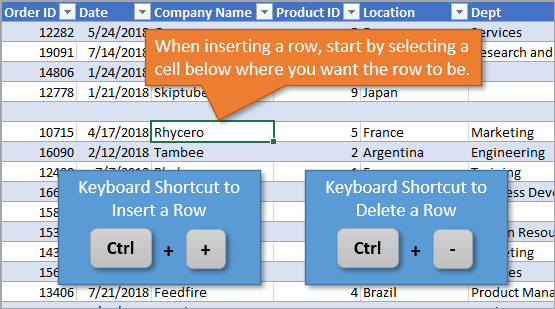
5. Inserting/Deleting Rows and Columns
To insert a row, start by selecting any cell in the table. The inserted row will be above that cell. Then type Ctrl + +. (If you are using a laptop, you may need to hit Ctrl + Shift + +.)
Deleting a row is similar. Start by selecting any cell in the row you want to delete and then hit Ctrl + -.
For inserting or deleting columns, the commands are the same. However, you first start by selecting two or more cells in the same column, then press Ctrl + + or Ctrl + -.
You can also select the entire row or column before pressing the shortcuts, but it is not required.
6. Open the Filter Drop-Down Menu
To open the filter drop-down menu, press Alt + ↓ if your cursor is on the header cell.

If you have a cell selected further down the column, just hit Shift + Alt + ↓. This will open the filter drop-down menu without having to scroll back up to the header cell.
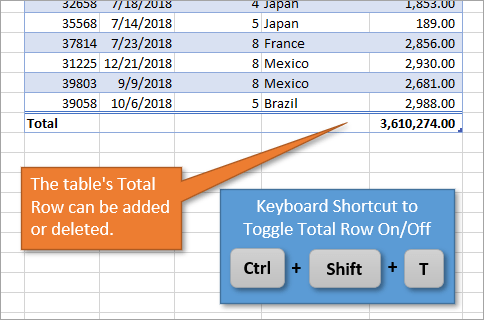
7. Toggle the Total Row
On an Excel Table, you can add or delete a Total Row at the bottom really easily. To toggle the row on and off, just hit Ctrl + Shift + T.
8. Renaming a Table
To rename a table, just use keyboard shortcut Alt + J T A. That will set the focus on the Table Name box in the ribbon so that you can update the name.
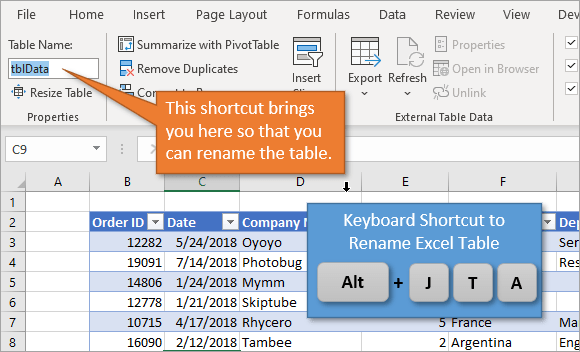
This shortcut is only available on Windows.
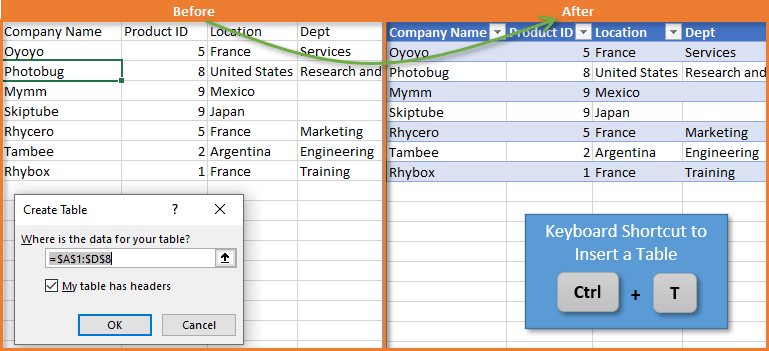
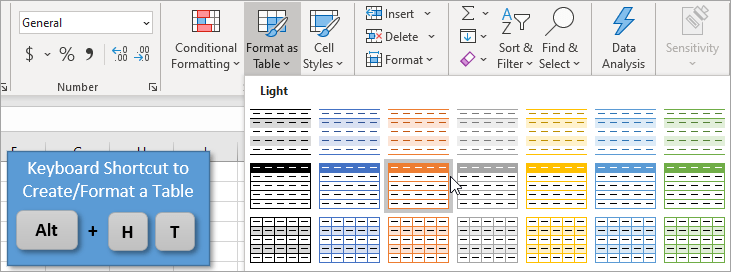
9. Insert a Table
Turning your data into an Excel Table is really easy when you use the shortcut Ctrl + T. This will bring up the Create Table window, including what Excel assumes the boundaries for your table should be. If those look right, you can just hit OK, and it will format your data as a table.
If you'd like to select different formatting for your table when inserting it, you can instead use the shortcut Alt + H T. (This shortcut is only for Windows.) This brings up a menu of formatting options and you can select whichever you like best.
Checkout this post & video on Tips & Shortcuts for Inserting Excel Tables to learn more.
10. Refresh a Query
If your table is connected to a query through Power Query, you can refresh it by hitting Alt + F5.

You can also right-click the table and select Refresh.
Related Posts
Want to see more shortcuts? Check out these tutorials!
Conclusion
I hope these shortcuts help to save you time and add to your reputation of Excel wizard in your workplace. Let me know if you have any questions or if you find these types of post helpful by leaving a comment below. See you next time!


A really useful set of shortcuts. I have been watching your videos for about a year now and learned loads of useful stuff. Thanks
Thank you, Peter! I appreciate your continued support and happy to hear you are learning more about Excel. 🙂
Glad I found your site. Every tutorial so far has been a great tool for learning more about what you can do in Excel.
Tables and Vlookup are two of my new ‘Gotta Learn’ things and you are helping immensely. I even bought two of your recommended books at Christmas time.
I have tried several email Excel subscriptions but it always comes back to just two that I keep and yours is one of them.
Thank you Jon for making Excel fun and productive in a clear and concise way.
I trust by now you’ve graduated to XLOOKUP!
Jon, never been able to get tip #3 to work for me. Tried on 2 different Excel’s (Office Pro 2016 and Microsoft 365 Apps for enterprise), both with the same build. When I try to move the column, I don’t get the green bar and it tries to overwrite the column where I drop it.
It doesn’t work for me, either. I always get the error message “Can’t move cells in a filtered range or table.” Is clicking on the right border when the crosshairs appears supposed to select the entire table column? Before I tried this method I tried by selecting the entire table column (hovering over the header cell until the black downward arrow appeared, then clicking), and I got the same message. I’m always careful to keep the cursor in the header row when dragging.
Not this method or any other I’ve tried works for me. I can’t understand why it’s so hard even to find any information about it, let alone instructions that actually work.
I usually have problems with inserting rows, mainly, not wanting to insert a copy of another row and end up inserting a blank row, then pasting. Seldom need to do columns but it seems to me that’s been hit or miss for me as well.
But experimenting after reading your exact language, and Jon’s, I think my problem was I never realized the feature only worked and looked to work when the cursor stayed in the header row, like literally so. I believe it possible that fits Marc’s situation.
For yours though…
With that kind of exactness in mind, I tried some column moving and it all worked wonderfully. Then I tried setting up your exact language, the error message’s anyway, which seemed to me to fit ONLY if the column were filtered so that some cells might not be displayed.
It failed, and gave me the same message. That implies to me that it wants to somehow move only the column’s visible cells and cannot figure out how to do that, what to do where there’s be blanks, and how to handle what’s left behind. And so it fails.
It also fails for all other columns as well, not just one that has an actual in-use filter limiting the display of rows. Which makes sense.
So my thought is that you could do it by clearing all filtering and then doing the move/s desired. Not an Excel employee whose job is writing documentation, nor do I play one on TV, but that seems to fit.
Very helpful shortcut tips. Thank you!
The Ctrl + does not seem to work for me to add a row. All it does is beep at me. Ctrl Shift + does nothing for me. Ctrl – does seem to work fine though.
Is there a keyboard shortcut for *MOVING* a selected table row (a row selected with SHIFT+space)?
I know I can use a mouse to drag it, but I’d like to keep my hands on the keyboard.
Thanks a lot, that was really helpful.
Great tips! I never realized how much time I could save using shortcuts in Excel. The ones for formatting tables are especially helpful. Can’t wait to try them out! Thanks for the insight!
Great tips! I never knew how much time I could save with these shortcuts. The explanation for each shortcut was really clear. Thanks for sharing!
Great tips! I always found navigating Excel tables a bit cumbersome, but these shortcuts will definitely speed up my workflow. Thanks for sharing!
When using XLOOKUP, I’ve struggled getting the column selection right for the array arguments. I just tested column selection when building a formula & it worked flawlessly! Thanks much, Jon.
Great tips! I wasn’t aware of some of these shortcuts, especially the one for quickly selecting a table range. It’s going to save me a lot of time in my data analysis. Thanks for sharing!
Great tips! I had no idea about the Ctrl + T shortcut to create a table. It’s going to save me so much time. Thanks for sharing these essential Excel shortcuts!
Great post! These shortcuts will definitely speed up my workflow in Excel. I especially love the tip about quickly formatting tables. Thanks for sharing!
Great tips! I never realized how much time I could save with these shortcuts. The one for quickly selecting an entire table is a game changer for my workflow. Thanks for sharing!
Great tips! I never realized how much time I could save using these shortcuts. The Format As Table shortcut alone will change the way I work with data. Thanks for sharing!