Bottom Line: Learn 5 different techniques to find and remove spaces in Excel. Spaces can cause formula errors and frustration with data preparation and analysis.
Skill Level: Intermediate
Watch the Tutorial
Download the Excel File
You can download the workbook that I use in the video, including the macro I wrote to remove blank spaces.
Space Hunting
Blank spaces can be a headache for data analysts and formula writers. That's because they are not easy to spot, yet can cause frustrating calculation errors.
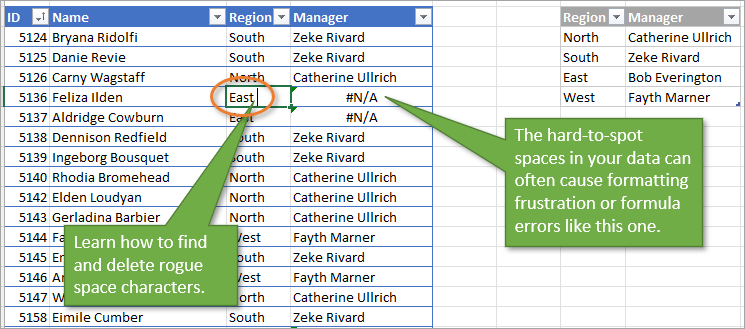
After many years of working with Excel, I've become a Space Hunter. That sounds like a sci-fi movie title, but it's just someone who can quickly locate and delete superfluous spaces in cell values.
Based on my space hunting experience, here are five techniques I use frequently to clean up data.
1. Find & Replace
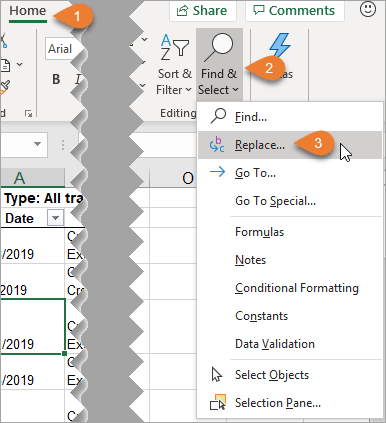
The first method for space hunting is to use the Find & Replace feature.
After highlighting the cells that you want to search through, go to the Home tab. Then open the Find & Select dropdown menu. Select the Replace option. The keyboard shortcut for this is Ctrl + H.
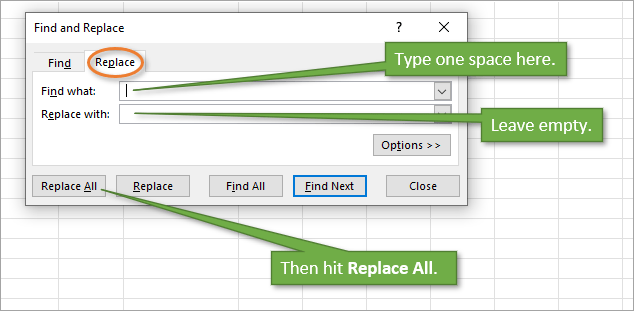
That will bring up the Find and Replace window. On the Replace tab, place one blank space in the Find what field. Make sure there is nothing in the Replace with field. Hitting Replace All (keyboard shortcut: Alt+A) will remove any instances of a space in the data set that you selected.
Although this method is really quick and easy, it's only useful for data where you want ALL spaces removed. However, there are times when you want to keep spaces between words. For example, if your cells contain both first and last names, you will probably want to keep the space in between those names.
That scenario leads us to our second method for space hunting.
2. The TRIM Function
The TRIM function removes all spaces in a text string, except for single spaces between words.
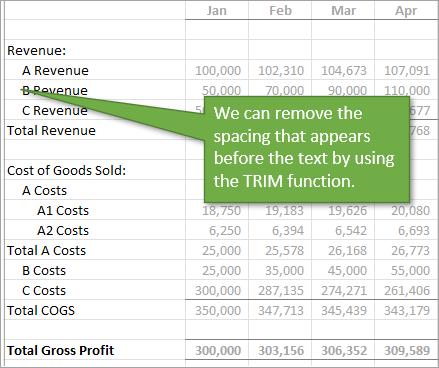
Below is an example of a report where some of the cells look like they are indented but the indentation is actually just extra spaces. Let's say we want to remove those spaces for uniformity's sake. We can use the TRIM function to do that.
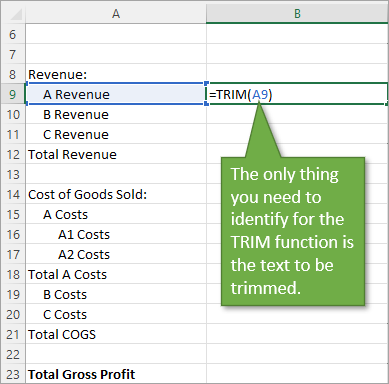
In a blank column, start by typing the equals sign (=) and the word TRIM, then tab into the TRIM function.
The only thing you need to identify for the TRIM function to work is the text that needs trimming. So either type the name of the cell or click on the cell that you want to trim and hit Enter. This will return the result you're looking for: text with no spaces before or after it.
When you copy the formula down for the whole column, the result looks like this.
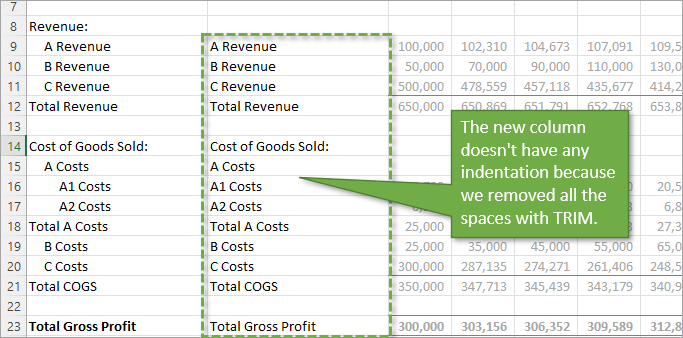
As you can see, the spacing between the words remains in place, but any spacing before or after the text is removed.
With this method, we had to create a whole new column, so you would have to add the additional step of replacing the original column with the new one using Copy and Paste Values. You can then delete the column with the formulas.
3. Power Query
Like functions and formulas, queries can also be tripped up by the inclusion of a stray blank space.
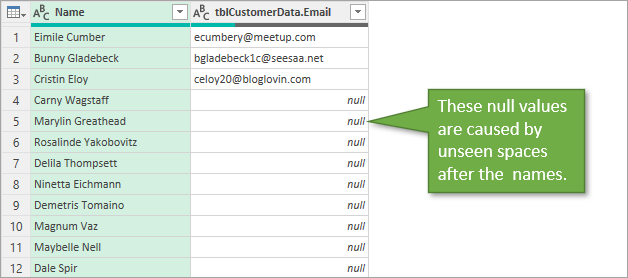
If you are unsure if blank spaces are what's causing the problem, you can click into the Editor's preview to see if there is a space or not.

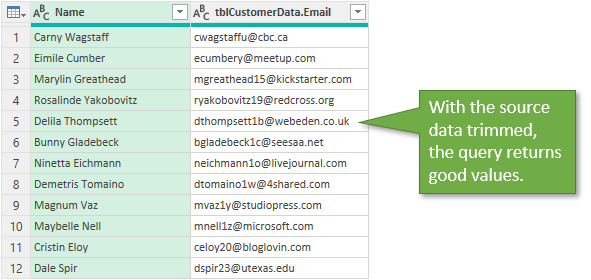
To remove the spaces, Power Query has a Trim feature found in the right-click menu. With the column that you want to fix selected, just right-click and choose Transform, and Trim.

This trims all the blank space before/after the text string so that the query will return the correct values.
If you are relatively new to Power Query, or could use a refresher, I recommend checking out my free webinar: The Modern Excel Blueprint.

4. Macros and VBA
Let's look at the same example we used for the TRIM function, but this time we will use a macro to trim extra spaces from text.
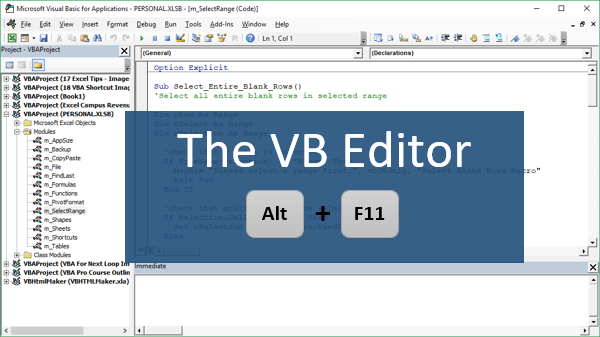
Start by opening the VB Editor. Go to the Developer tab and select the Visual Basic Button. The keyboard shortcut is Alt + F11.
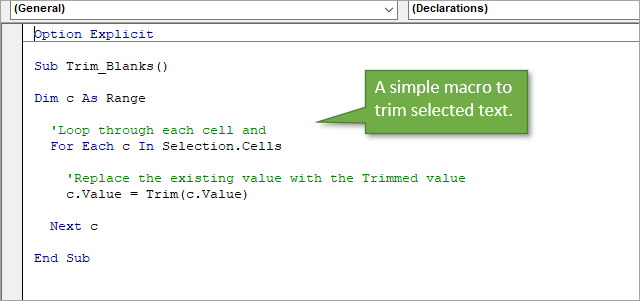
I've written a simple macro that loops through each cell and replaces the value of the cell with the trimmed value. If you'd like to copy this macro, you can find it in the download file at the top of this post.
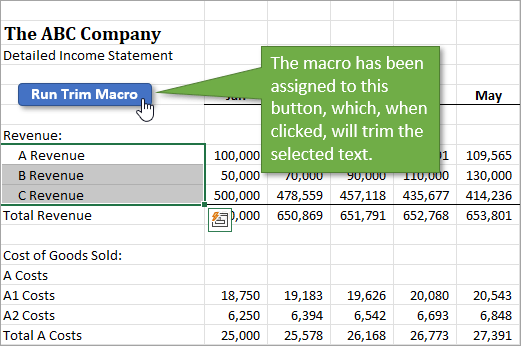
One of the benefits of using a macro is that you can assign it to a button. Here I've assigned it to a button on the actual worksheet.
And here, I've added it to the ribbon by including this macro in my Personal Macro Workbook and assigning a button to it.
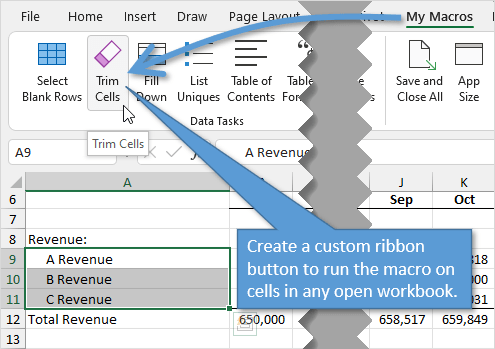
That way, I can use this macro on any workbook.
One downside to using the macro method for removing blank spaces is that you cannot undo the action once the macro has been run. In that case, it might be a good idea to save the file before running the macro, if you think you might need to un-trim the data for some reason.
It's also important to note that the VBA Trim function does NOT trim extra blank spaces between words. Excel's TRIM function will remove additional spaces between words. So if there are two spaces between the first and last name, TRIM will remove the additional space. VBA's Trim will not do this. It only removes spaces from the beginning or end of the string. Thanks to Marvin (an Excel Campus Community Member) for bringing this to our attention!
Here are tutorials for how to create a Personal Macro Workbook as well as how to make Macro buttons, whether on the worksheet or in the ribbon.
How to Create a Personal Macro Workbook (Video Series)
How to Create Macro Buttons in Excel Worksheets
5. Trimming Other Characters
Sometimes after you have trimmed the spaces from your text, you might still get calculation errors. One reason for this could be that another hard-to-detect character might be in play. One such character is the non-breaking space. This is often used in HTML coding ( ) and is similar to a regular space, but would not be deleted by the TRIM function or our macro.
To determine which character might be gumming up the works, you can use the CODE function. By copying and pasting the invisible character into a blank cell, and then identifying that cell's text in the CODE function (“text” is the only argument that needs to be identified for the CODE function), you will return a code number for that character. A quick Google search of that code number will reveal what type of character you are dealing with.
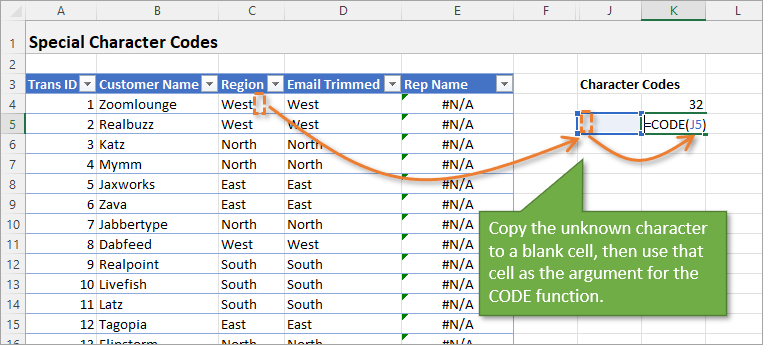
In this case, the non-breaking space character is code 160.
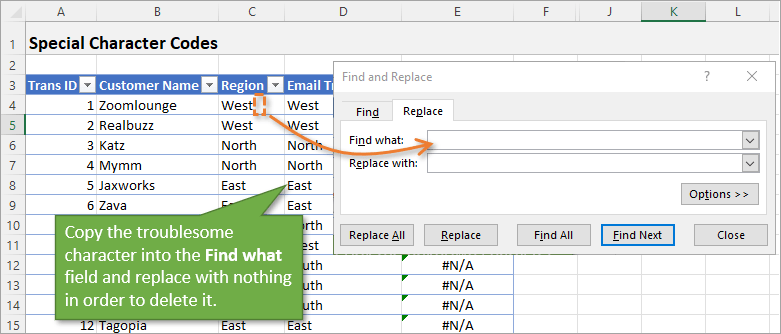
One way to remove that character from your text would be to use Find & Replace. You can simply copy the character and paste it into the Find what field.
You could also use the REPLACE function to do the same thing.
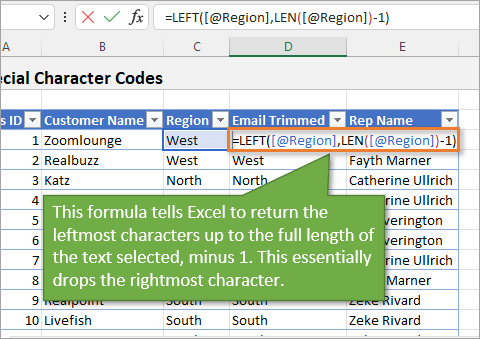
One other option, since we know we want to remove the last character in the text, would be to use the LEFT and LEN functions to essentially create a customized trim feature.
LEFT returns the leftmost characters in a cell, up to a designated amount. LEN (short for Length) returns the number of characters in a cell.
So combining those two functions and subtracting 1 from the LEN to remove that unwanted character would leave just the text without the additional character.
Conclusion
I hope this has been helpful for you. I also explain how spaces can cause errors in formulas in my video on an Introduction to VLOOKUP.
There are actually more than just five ways to go about this task, and if you'd like to add to the list, please leave a comment below. As always, you can ask questions there as well.
Thanks for following along. Until next time!


Jon: I am a retired civil engineer from the US Army Corps of Engineers. Although I am no longer actively analyzing data, I enjoy your excellent tutorials and often pass them along to family and friends. Keep up your great work! I wonder if you could show the tools you use to prepare the tutorials (short videos and screen shots). Usually my contacts need to prepare tutorials for their specific needs.
Hi Pedro,
Thank you for your service and congratulations on your retirement. I appreciate your continued support.
In regards to making the videos, we use Camtasia to record and edit the videos. We use Snagit for the screenshots. Both of these applications are developed by a company named TechSmith.
There are a lot of solutions on the market for screen capture videos. Camtasia is great if you want to edit the videos and add layers for intros/outros, annotations, zoom & pan, etc.
I hope that helps. Thanks again and have a nice day! 🙂
Hi!
Everything quite clear, nice post.
About character 160, I simply use a short VBA routine that trims first and checks for character 160:
…
test = Trim(Worksheets(“C”).Cells(i3, 24).Value)
ctc = Asc(Right(test, 1))
If ctc = 160 Then test = Left(test, Len(test) – 1
…
Best regards
Awesome! Thanks for sharing the macro Jacques! 🙂
Hi Jon,
nice post as ever! I like the macro solution and brought it to my PMW. Thanks!
I noticed that Trim just trims at the end of the strings. With the worksheet function it trims also multiple spaces in the middle of the strings:
Application.WorksheetFunction.Trim(c.Value)
hello sr please how to count conditional formatting highlighted value .
I have data that I copy into Excel that often comes with one space at the end of a number. When I try the Find and Replace procedure that you share above, it returns “We did not find anything to replace.” and the single space remains. Any suggestions? Thank you.
How do you find the invisible character between other characters?
In this text, there is an invisible character between the letters U and I. You cannot see it, but if you use the cursor left/right and count the characters, you will see there is a space between U and I.
BWP800HDFUINT
Great tips! I often struggle with blank spaces in my spreadsheets, and these methods seem super practical. I can’t wait to try them out and streamline my data. Thanks for sharing!
Great tips! I often struggle with blank spaces in my spreadsheets, and these methods seem really effective. I can’t wait to try them out! Thanks for sharing!
Great tips! I’ve struggled with blank spaces in my Excel sheets for too long. The formula method you described is a game changer. Thanks for sharing these techniques!
Great tips! I always struggle with blank spaces in my spreadsheets, and your methods are super helpful. I’ll definitely try out the Find and Replace feature next time. Thanks for sharing!
Thank you for these helpful tips! I’ve struggled with blank spaces in my spreadsheets for too long, and your methods seem straightforward and easy to follow. I can’t wait to try the Find & Replace trick!
Great tips! I never realized how much of a difference removing blank spaces could make in my data analysis. I can’t wait to try out the find and remove methods you outlined. Thanks for sharing!
Thanks for these helpful tips! I often struggle with blank spaces in my spreadsheets, and your methods are easy to follow. Can’t wait to try them out on my next project!
Great tips! I never realized how many blank spaces could clutter my data. The formula method you shared was particularly helpful. Thanks for making Excel cleaning so much simpler!
Great tips! I often struggle with blank spaces in my spreadsheets, and these methods will really help streamline my workflow. I appreciate the clear instructions and practical examples you provided. Thanks for sharing!
Great post! I always struggled with blank spaces in my Excel spreadsheets, but your tips are clear and easy to follow. The keyboard shortcuts you mentioned will definitely save me time. Thanks for sharing!
Great tips! I always struggle with blank spaces in my Excel sheets, and these methods are super helpful. I especially liked the idea of using the Find feature. Thanks for sharing!
Great tips! I never realized how many blank spaces could be hiding in my spreadsheets. The formulas you shared are super helpful for cleaning up my data. Thanks for sharing!
Great tips! I particularly found the method using the Go To Special feature super helpful. It saved me so much time when cleaning up my spreadsheets. Thanks for sharing!
Great tips! I often struggle with blank spaces in my spreadsheets, and these methods seem super helpful. Can’t wait to try them out! Thank you for sharing!
Great tips! I often struggle with blank spaces in my spreadsheets, and these methods are super helpful. I particularly like the idea of using the Go To Special feature—definitely going to try that next time! Thanks for sharing!
Great tips! I often struggle with blank spaces in my Excel sheets, and these methods are super helpful. Thanks for sharing such practical solutions!
Great tips! I always struggled with blank spaces in my Excel sheets, but your methods seem straightforward and effective. I can’t wait to try the find and replace trick you mentioned. Thanks for sharing!
Great tips! I’ve struggled with blank spaces in my spreadsheets for ages. The shortcut methods you shared will definitely save me time. Thanks for the clear explanations!
Thank you for sharing these tips! I always struggled with blank spaces in my spreadsheets. The shortcut techniques you mentioned are going to save me so much time. Can’t wait to try them out!
This post was super helpful! I often struggle with blank spaces in my datasets, and the tips provided here are clear and easy to follow. I especially appreciated the shortcut keys—you really made the process more efficient. Thanks for sharing!
Great tips! I always struggled with blank spaces in my spreadsheets, but your methods are straightforward and easy to follow. I can’t wait to try the Find and Replace technique. Thanks for sharing!
Great tips! I especially found the method using Find and Replace super helpful. It saved me so much time when cleaning up my data. Thanks for sharing!